This post contains affiliate links. As an Amazon Associate, I earn from qualifying purchases. This comes at no extra cost to you.
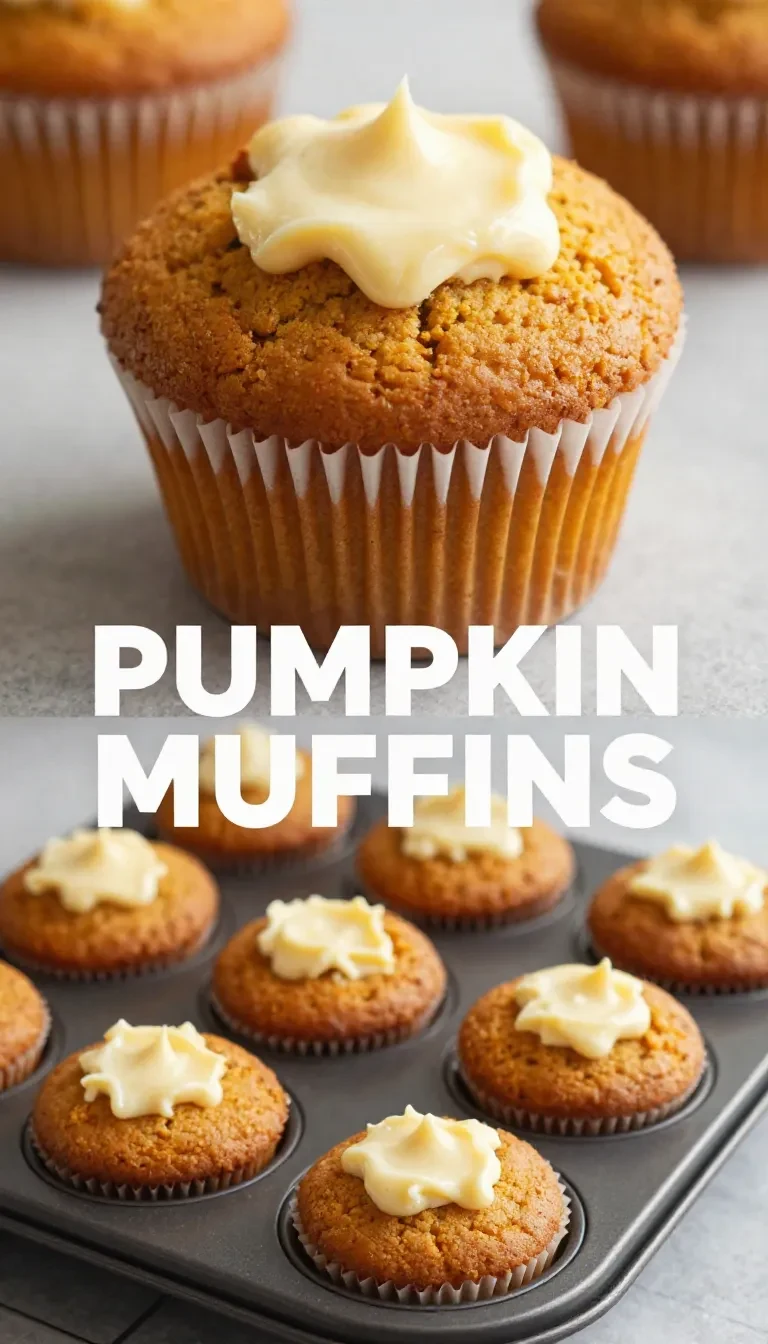
How To Make Pumpkin Cream Cheese Muffins From Scratch
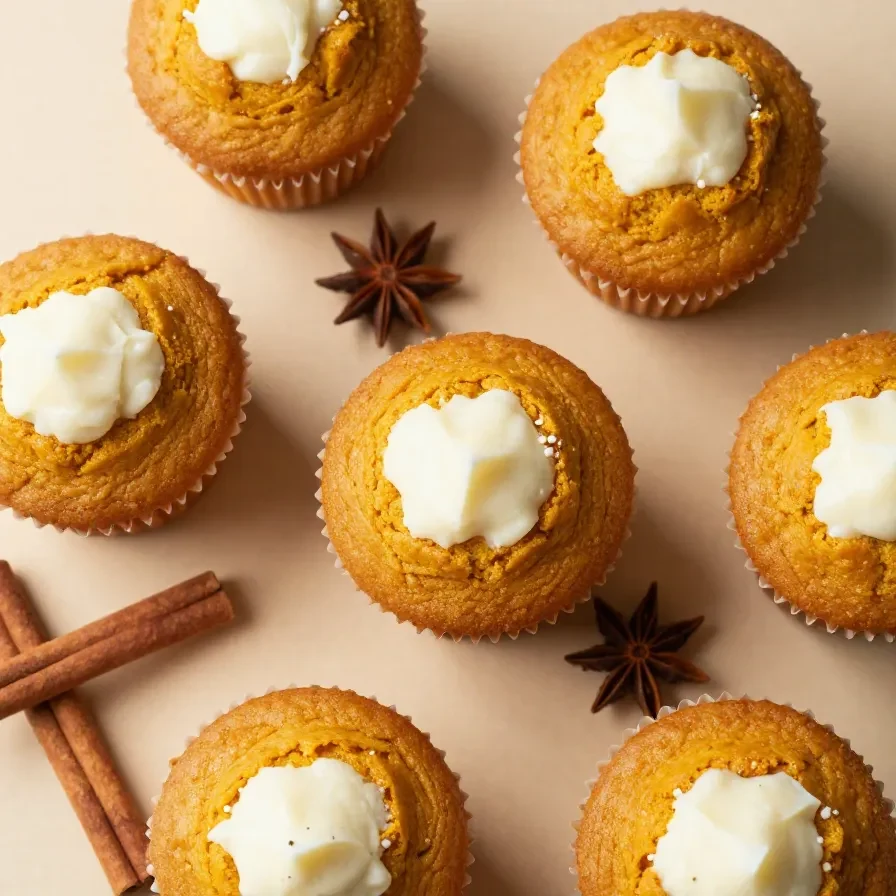
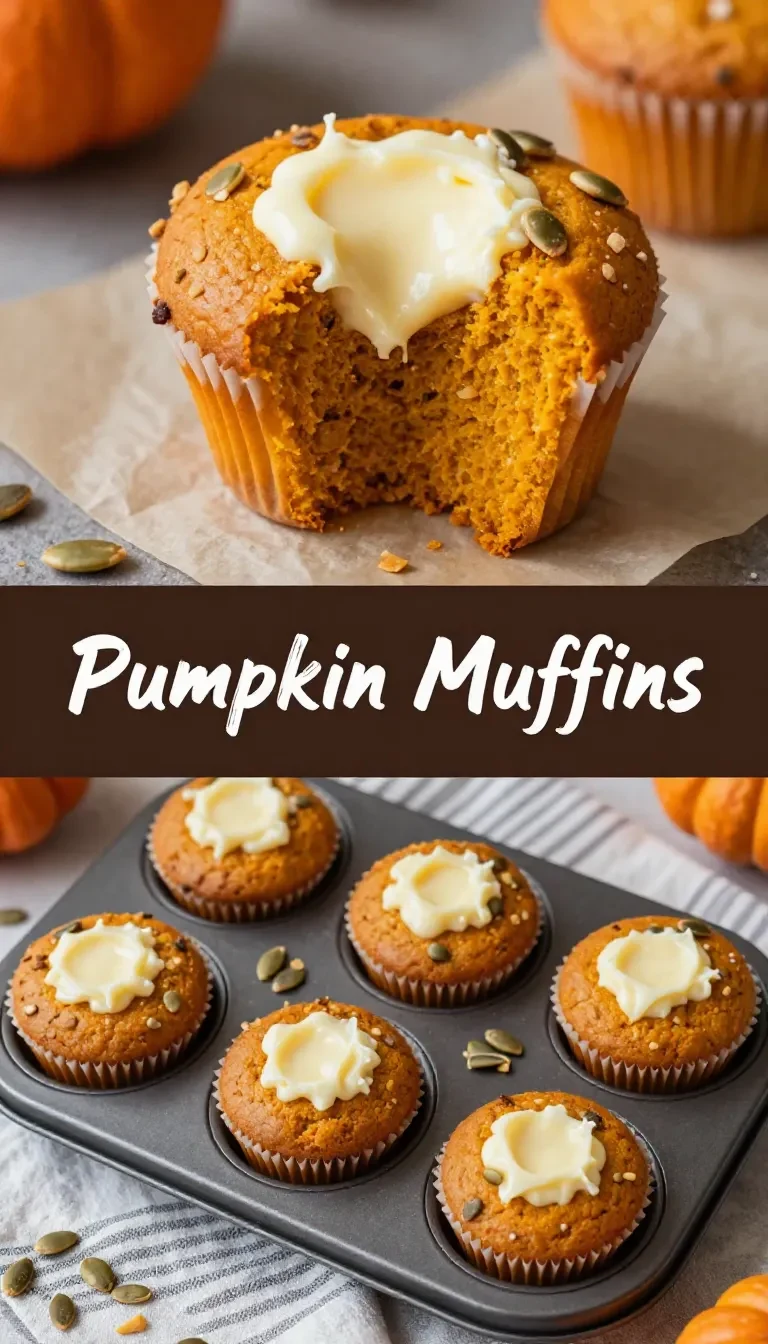
Pumpkin Cream Cheese Muffins bring together the best of autumn with warm spices, moist pumpkin batter, and a luscious cream cheese center. Each bite offers a perfect balance of sweet and tangy, with a tender crumb that melts in your mouth. They’re ideal for pairing with a hot cup of coffee or tea, making them a seasonal favorite for breakfasts or desserts.
Versatile treat for any time of day: Pumpkin Cream Cheese Muffins are great for breakfast or dessert, satisfying sweet cravings while offering plenty of seasonal flavor.
Perfectly balanced texture: The moist pumpkin base pairs beautifully with the rich, creamy filling, ensuring each bite is luxurious yet light.
Easy for beginner bakers: With simple steps and readily available ingredients, this recipe is approachable for anyone wanting to bake from scratch.
Seasonal joy with a twist: These muffins highlight the comforting spices of autumn, with a cream cheese center that feels like a delightful surprise.
Everything You Need for Pumpkin Cream Cheese Muffins
The pumpkin puree serves as the star of this recipe, bringing moisture and deep flavor to the muffins. Combined with warming spices like cinnamon, nutmeg, and ginger, these ingredients create a taste that’s unmistakably autumn.
How To Make Pumpkin Cream Cheese Muffins Step by Step
Preheat your oven to 375°F (190°C) and line a muffin tin with paper liners.
In a large mixing bowl, whisk together the flour, granulated sugar, baking soda, baking powder, salt, cinnamon, nutmeg, ginger, and cloves.
In a separate bowl, whisk the eggs, pumpkin puree, vegetable oil, and vanilla extract until smooth.
Slowly add the wet ingredients to the dry ingredients, stirring until just combined. Avoid overmixing to prevent dense muffins.
Prepare the cream cheese filling in another bowl by beating the softened cream cheese, powdered sugar, and vanilla extract until smooth.
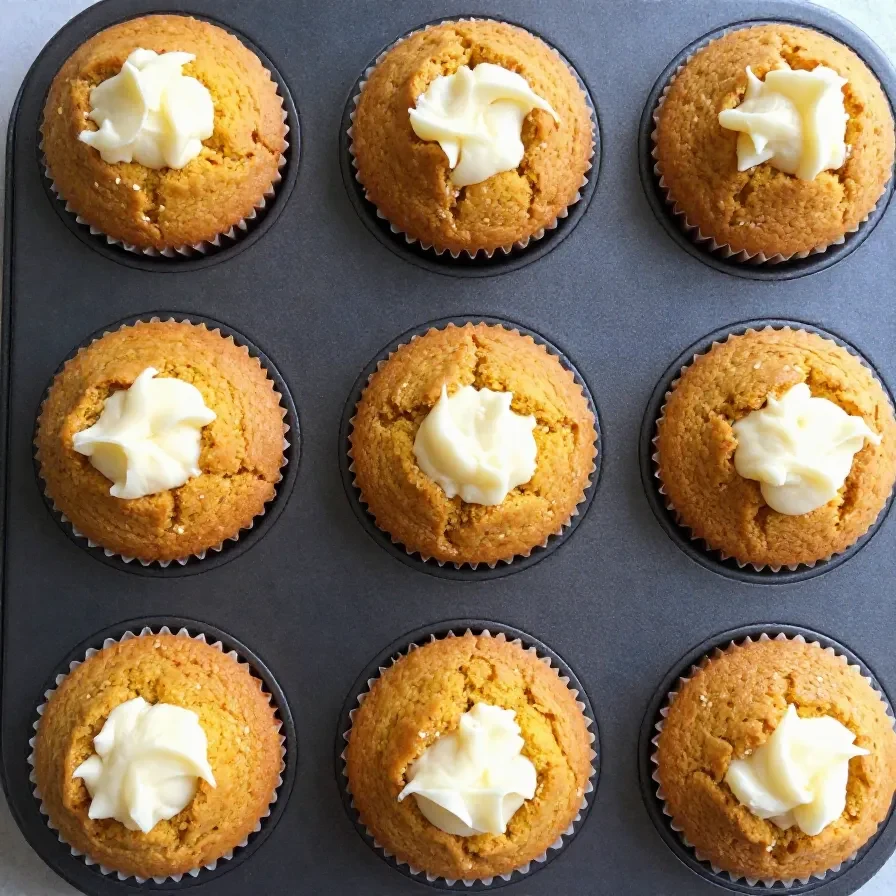
Fill each muffin cup about two-thirds full with the pumpkin batter.
Add a dollop of the cream cheese mixture to the center of each muffin, and gently swirl it into the batter using a toothpick or spoon.
Bake for 18-22 minutes, or until a toothpick inserted in the pumpkin portion comes out clean.
Remove the muffins from the oven and let them cool for five minutes in the pan, then transfer to a wire rack to cool completely.
Kitchen ApplianceKitchenAid Artisan Stand Mixer
Makes mixing batters and fillings effortless — a must-have for baking enthusiasts.
Common Questions About Pumpkin Cream Cheese Muffins
Can I use canned pumpkin puree? Yes, canned pumpkin puree works perfectly and offers consistent results. Be sure not to use pumpkin pie filling, as it contains added sugar and spices.
Why is my cream cheese sinking? Adding the cream cheese filling carefully and swirling it lightly ensures it stays suspended within the muffin batter.
How can I tell if the muffins are done? Insert a toothpick into the pumpkin portion; it should come out clean when the muffins are ready.
Storage and Reheating Tips
Once cooled, store your Pumpkin Cream Cheese Muffins in an airtight container at room temperature for up to two days. For longer storage, refrigerate them for up to a week. You can also freeze them for up to three months; wrap each muffin individually, then place them in a freezer-safe bag.
To reheat, thaw frozen muffins in the fridge overnight. Warm them briefly in a microwave or oven at 350°F (175°C) for a fresh-from-the-oven experience.
Preheat your oven to 375°F (190°C) and line a muffin tin with paper liners.
In a large mixing bowl, whisk together the flour, granulated sugar, baking soda, baking powder, salt, cinnamon, nutmeg, ginger, and cloves.
In a separate bowl, whisk together the eggs, pumpkin puree, vegetable oil, and vanilla extract until smooth.
Slowly add the wet ingredients to the dry ingredients, stirring until just combined. Avoid overmixing.
In another bowl, prepare the cream cheese filling by beating the softened cream cheese, powdered sugar, and vanilla extract until smooth and creamy.
Fill each muffin cup about 2/3 full with the pumpkin batter.
Add a dollop (about 1 teaspoon) of the cream cheese mixture to the center of each muffin. Use a toothpick or the back of a spoon to gently swirl the cream cheese filling into the batter.
Bake for 18-22 minutes, or until a toothpick inserted into the pumpkin portion of the muffin comes out clean.
Remove the muffins from the oven and let them cool in the pan for 5 minutes, then transfer to a wire rack to cool completely.
Notes
For best results, use room-temperature cream cheese and avoid overmixing the batter to keep the muffins light and fluffy.
Calories: 210kcal
Cost: $8
Course: Dessert
Cuisine: American
Keyword: cream cheese filling, pumpkin muffins
Loved this recipe? Save it to your favorite Pinterest board so you can easily find it later! ✨
This post contains affiliate links. As an Amazon Associate, I earn from qualifying purchases. This comes at no extra cost to you.
Starbucks Pumpkin Cream Cheese Muffins Recipe
Starbucks Pumpkin Cream Cheese Muffins
Starbucks Pumpkin Cream Cheese Muffins combine moist pumpkin-spiced cake with a tangy, creamy center and a crunchy topping for the ultimate autumn treat. The harmonious blend of cinnamon, nutmeg, and cloves fills your kitchen with a warm, comforting aroma as they bake. Perfect for sharing or savoring with a morning coffee, these muffins are an irresistible seasonal favorite.
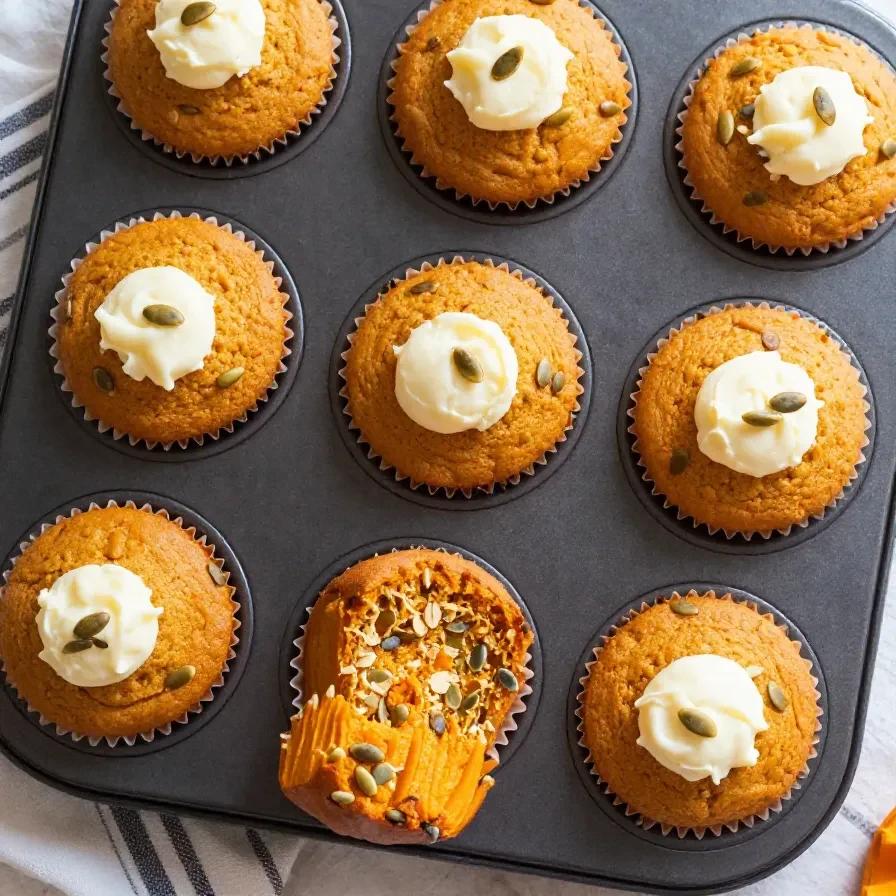
The canned pumpkin puree ensures consistent moisture and rich pumpkin flavor, while the pepitas add a delightful crunch that complements the soft texture of the muffins.
How To Make Starbucks Pumpkin Cream Cheese Muffins Step by Step
Preheat the oven to 375°F (190°C) and line a muffin tin with paper liners.
In a large bowl, whisk together the flour, granulated sugar, baking soda, baking powder, salt, cinnamon, nutmeg, and cloves.
In a separate bowl, beat the eggs, pumpkin puree, vegetable oil, and vanilla extract until smooth.
Gradually mix the wet ingredients into the dry ingredients until just combined. Be careful not to overmix.
Kitchen ApplianceKitchenAid Artisan Stand Mixer
Makes mixing dough and batters effortless — a kitchen game-changer for baking enthusiasts.
In a small bowl, beat the softened cream cheese and powdered sugar together until smooth and creamy.
Fill each muffin liner about two-thirds full with the pumpkin batter.
Spoon a teaspoon of the cream cheese mixture onto the center of each muffin and lightly press it down into the batter.
Sprinkle pepitas over the tops of the muffins for added texture and flavor.
Bake for 18-22 minutes, or until a toothpick inserted into the muffin (avoiding the cream cheese center) comes out clean.
Cool the muffins in the pan for 5 minutes, then transfer them to a wire rack to cool completely before serving.
Common Mistakes to Avoid
Overmixing the batter: This can result in dense, rubbery muffins. Mix until the dry ingredients are just incorporated into the wet ingredients.
Skipping the cream cheese chill: Ensure the filling is properly softened before mixing to avoid lumps in the center of your muffins.
Overbaking: Keep an eye on the baking time, as overbaking dries out the muffins. Use a toothpick to check for doneness toward the end of the baking window.
Expert Tips and Pro Shortcuts
Room temperature eggs: Using eggs at room temperature helps them blend more smoothly with the other ingredients, ensuring an even texture.
Chill the cream cheese mixture: If the cream cheese filling feels too soft, refrigerate it for 10 minutes before adding it to the batter.
Double the batch: These muffins freeze exceptionally well, so make extras to enjoy throughout the week.
Use an ice cream scoop: Scoop the batter evenly into the muffin liners for consistent size and a professional appearance.
A Peek Into the Story Behind This Dish
Starbucks Pumpkin Cream Cheese Muffins are a seasonal favorite that first gained popularity in coffee shops due to their unique combination of flavors and textures. Inspired by timeless fall ingredients like pumpkin and spice, these muffins offer a comforting way to celebrate the season.
The addition of cream cheese filling and pumpkin seeds elevates the muffins, blending bakery-style sophistication with a homemade twist that has made them a beloved treat for many.
This post contains affiliate links. As an Amazon Associate, I earn from qualifying purchases. This comes at no extra cost to you.
Pumpkin Cream Cheese Muffins Recipe
Pumpkin cream cheese muffins bring together the warmth of fall spices with a velvety cream cheese swirl, creating a moist, flavorful treat. Each bite balances the spiced pumpkin base with a tangy, creamy filling that melts in your mouth. Perfect for breakfast, dessert, or an afternoon snack, these muffins are a seasonal favorite worth mastering.
These muffins are quick to prepare, making them ideal for busy mornings or last-minute baking needs. The recipe uses simple pantry staples, saving you a trip to the store.
The combination of pumpkin puree and warm spices creates a rich, seasonal flavor that feels like autumn in every bite. Adding the cream cheese swirl elevates the texture and taste to cafe-quality.
Perfect for sharing, they’re sweet enough for dessert yet balanced enough for breakfast. Whether enjoyed with coffee or packed as a snack, they’re versatile for all occasions.
Homemade pumpkin cream cheese muffins rival bakery offerings, allowing you to control the quality of ingredients. This makes them a healthier and more budget-friendly option.
Everything You Need for Pumpkin Cream Cheese Muffins
The pumpkin puree is the star ingredient, delivering moistness and depth of flavor to the muffins. Ground spices such as cinnamon, nutmeg, and cloves create the warmth that pairs beautifully with the tangy cream cheese filling.
How To Make Pumpkin Cream Cheese Muffins Step by Step
Preheat your oven to 375°F (190°C) and line a 12-cup muffin tin with paper liners. This ensures easy removal and a clean presentation once baked.
In a large bowl, whisk together the flour, granulated sugar, brown sugar, baking soda, salt, cinnamon, nutmeg, and cloves. Mixing dry ingredients thoroughly prevents uneven flavors or textures.
In a separate medium bowl, combine the pumpkin puree, eggs, vegetable oil, and vanilla extract until smooth. This helps create a uniform batter without overmixing the flour later.
Gradually add the wet ingredients to the dry ingredients and mix until just combined. Avoid overmixing to keep the muffins tender and fluffy.
In another bowl, prepare the cream cheese filling by beating together the softened cream cheese, 1/4 cup granulated sugar, and 1 teaspoon vanilla extract until smooth and creamy.
Kitchen ApplianceKitchenAid Artisan Stand Mixer
Makes mixing batter and cream cheese filling effortless — a premium tool for baking enthusiasts.
Fill each muffin cup about 2/3 full with the pumpkin batter. This leaves room for the cream cheese swirl and ensures the muffins don’t overflow while baking.
Add a small dollop of the cream cheese mixture (about 1 teaspoon) on top of each muffin and gently swirl it into the batter using a toothpick or knife. This creates the signature creamy swirl on every muffin.
Bake the muffins in the preheated oven for 18-22 minutes, or until a toothpick inserted into the muffin (avoiding the cream cheese swirl) comes out clean. Allow the muffins to cool in the tin for 5 minutes before transferring them to a wire rack to cool completely.
A Look Into Pumpkin Muffin Origins
Pumpkin muffins are often traced back to the traditional pumpkin pie flavors baked into a portable form. By combining warm spices with a hint of sweetness, they became popular as seasonal treats during autumn harvests.
Adding cream cheese originated as a way to blend tanginess with the earthy sweetness of pumpkin, creating a rich and indulgent baked good. Today, pumpkin cream cheese muffins are loved worldwide for their balance of flavors and textures.
Use room-temperature cream cheese when making the filling for a smooth, lump-free consistency. Cold cream cheese can result in uneven swirls.
Do not overmix the batter after adding wet ingredients; this prevents dense muffins and ensures a tender crumb. Mix just until the dry streaks disappear.
Swirling the cream cheese filling lightly is key—over-swiring may blend the two layers too much, losing the visual and textural contrast.
Test the muffins for doneness by inserting a toothpick into the pumpkin batter, avoiding the cream cheese swirl. This ensures accurate results without gooey false readings.
Common Questions About Pumpkin Cream Cheese Muffins
Can I freeze pumpkin cream cheese muffins? Yes, they freeze well for up to two months. Wrap each muffin individually in plastic wrap and store in an airtight container.
How should I store these muffins? Store them in an airtight container in the refrigerator for up to five days to keep the cream cheese filling fresh.
Can I make these gluten-free? Substitute the all-purpose flour with a 1:1 gluten-free baking mix. The texture remains light and flavorful with this adjustment.
Simple Ingredient Swaps and Substitutions
Vegetable oil: Swap with melted coconut oil or avocado oil for a slightly different flavor profile. Both work well for keeping the muffins moist.
Brown sugar: Replace with coconut sugar for a deeper, caramel-like sweetness that complements the pumpkin and spices beautifully.
Cream cheese: Use a dairy-free cream cheese for a lactose-free option. Be sure to choose one with a creamy texture for easy swirling.
Preheat your oven to 375°F (190°C) and line a 12-cup muffin tin with paper liners.
In a large bowl, whisk together the flour, granulated sugar, brown sugar, baking soda, salt, cinnamon, nutmeg, and cloves.
In a separate medium bowl, combine the pumpkin puree, eggs, vegetable oil, and vanilla extract until smooth.
Gradually add the wet ingredients to the dry ingredients and mix until just combined. Do not overmix.
In another bowl, prepare the cream cheese filling by beating together the softened cream cheese, 1/4 cup granulated sugar, and 1 teaspoon vanilla extract until smooth and creamy.
Fill each muffin cup about 2/3 full with the pumpkin batter.
Add a small dollop of the cream cheese mixture (about 1 teaspoon) on top of each muffin and gently swirl it into the batter using a toothpick or knife.
Bake the muffins in the preheated oven for 18-22 minutes, or until a toothpick inserted into the muffin (avoiding the cream cheese swirl) comes out clean.
Allow the muffins to cool in the tin for 5 minutes before transferring them to a wire rack to cool completely.
Notes
For best results, use room-temperature cream cheese and avoid overmixing the batter to keep the muffins light and fluffy.
Calories: 250kcal
Cost: $10
Course: Dessert
Cuisine: American
Keyword: cream cheese swirl, fall baking, pumpkin muffins
Loved this recipe? Save it to your favorite Pinterest board so you can easily find it later! ✨
This post contains affiliate links. As an Amazon Associate, I earn from qualifying purchases. This comes at no extra cost to you.
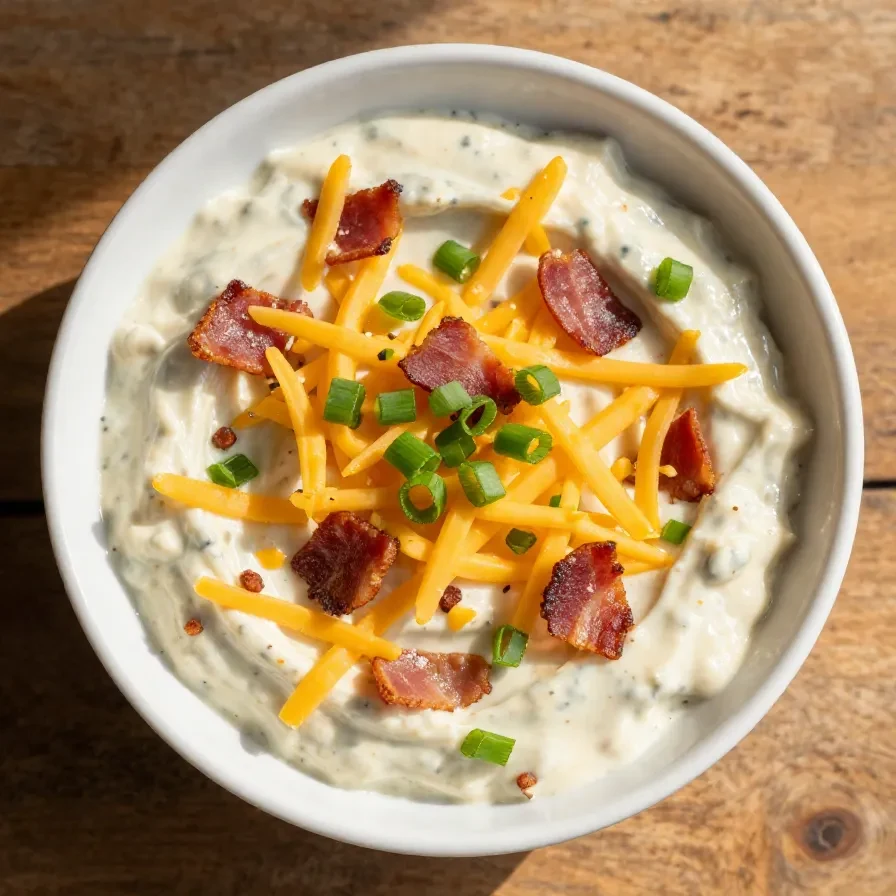
Million Dollar Crack Dip is a rich, creamy blend of cheddar cheese, bacon, and ranch seasoning that boasts bold, savory flavors in every bite. Perfect for pairing with crackers, chips, or fresh veggies, this crowd favorite combines simplicity with irresistible taste. Its velvety texture and smoky bacon aroma make it the ultimate centerpiece for any gathering.
Whether you’re hosting a party or want a snack-worthy dish, this dip comes together in minutes and offers endless possibilities for serving. With a few easy steps and pantry staples, you’re ready to create a dish that’s bound to be the highlight of the table.
The softened cream cheese is critical for ensuring the base mixes smoothly and evenly without lumps, while the ranch seasoning packs the dish with tangy, herbaceous notes.
How To Make Million Dollar Crack Dip Step by Step
In a large mixing bowl, combine the softened cream cheese, sour cream, and mayonnaise. Mix until smooth and well combined to create the creamy base.
Add the ranch seasoning mix to the bowl and stir thoroughly until it’s completely incorporated. This ensures even seasoning throughout the dish.
Fold in the shredded cheddar cheese, crumbled bacon, chopped green onions, and optional jalapeños. Be gentle as you mix to preserve the texture of the cheese and bacon.
Kitchen ApplianceKitchenAid Artisan Stand Mixer
Makes mixing creamy bases and folding ingredients effortless — ideal for this recipe.
Transfer the dip to a serving bowl or dish, cover it tightly, and refrigerate for at least 30 minutes. This resting time allows the flavors to meld together for maximum taste.
Serve chilled with crackers, chips, or fresh vegetables for dipping. Arrange the dip with your chosen sides to make it visually appealing and inviting.
Pro Tips for the Best Results
Soften the cream cheese fully: Leaving the cream cheese at room temperature for about 30 minutes ensures smooth mixing without lumps.
Mix thoroughly but gently: Overmixing can make the dip too dense, so fold in the ingredients with care to maintain its creamy texture.
Chill for at least 30 minutes: This step is key for flavor development, as the ingredients need time to blend together fully.
Adjust heat levels: Add jalapeños to taste or leave them out entirely for a milder version, catering to your audience.
The Story Behind This Dip
Million Dollar Crack Dip has become a staple in American party food culture, renowned for its irresistible combination of creamy and savory ingredients. The recipe likely draws inspiration from classic ranch dips, enhanced with bacon and cheddar for indulgent flavor.
Though its origin is unclear, its popularity exploded due to its ease and versatility, making it a favorite for gatherings of all kinds. Today, it’s a go-to for tailgates, potlucks, and family celebrations.
Avoid These Common Mistakes
Skipping the chilling step: Serving the dip immediately prevents the flavors from melding and can make it taste underwhelming.
Using cold cream cheese: Cold cream cheese will result in a lumpy texture, so ensure it’s softened before mixing.
Overloading with jalapeños: Adding too much spice can overpower the other flavors—start with a small amount and adjust as needed.
Frequently Asked Questions
Can I make this dip ahead of time? Absolutely! Prepare it up to a day in advance and store it tightly covered in the refrigerator.
What’s the best way to store leftovers? Transfer leftovers to an airtight container and refrigerate for up to three days.
Can I use low-fat ingredients? While possible, low-fat options may alter the creaminess and flavor, so full-fat versions are recommended for the best results.
This post contains affiliate links. As an Amazon Associate, I earn from qualifying purchases. This comes at no extra cost to you.
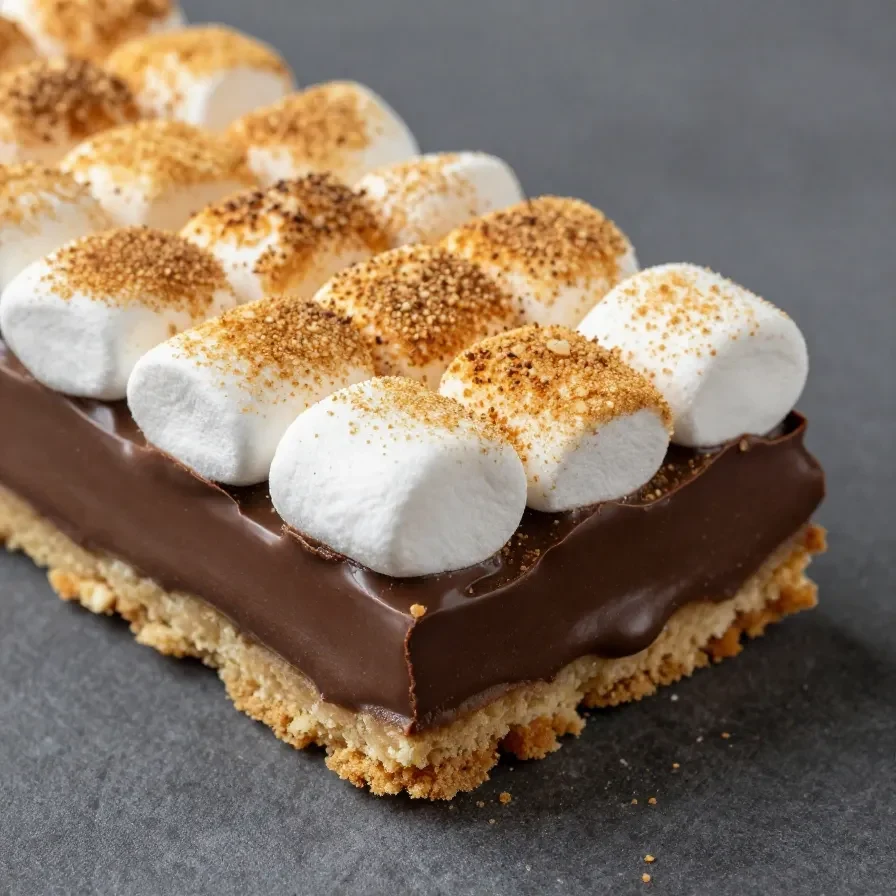
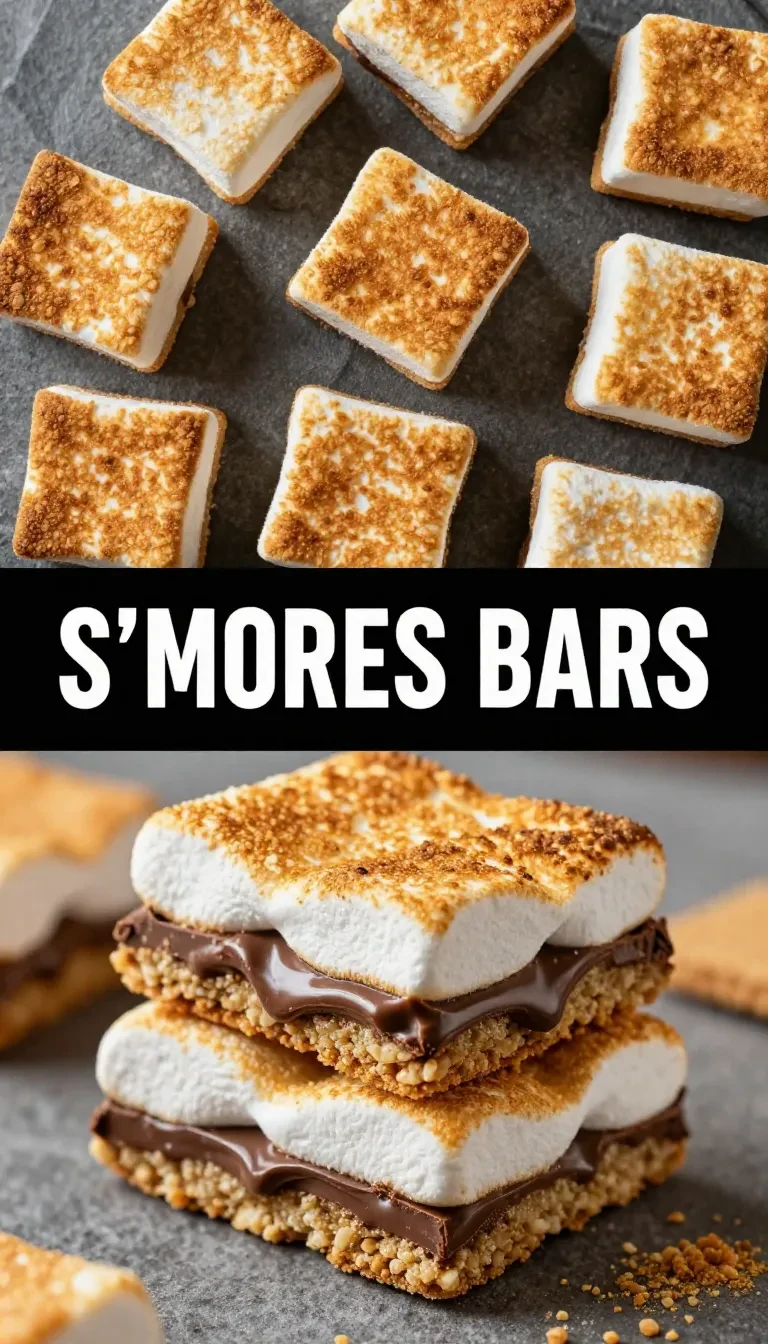
S’more Bars are a baked twist on the classic campfire treat, combining layers of buttery graham cracker crust, melted milk chocolate, gooey marshmallows, and sweetened condensed milk. Their sweet aroma and golden, toasted marshmallow topping make them irresistible for dessert lovers. Perfect served chilled, they deliver all the comfort of s’mores without the hassle of a fire.
They bring the flavor of traditional s’mores indoors without lighting a fire. Every bite has the signature combination of chocolate, marshmallow, and graham cracker.
S’more Bars are incredibly easy to bake, requiring just one pan and a handful of ingredients. Perfect for beginners or anyone who wants a quick dessert.
They travel well, making them ideal for tailgates, bake sales, or potlucks. Their firm texture after chilling ensures they hold their shape during transport.
These bars are versatile and can be sliced into bite-sized squares for parties or enjoyed as larger portions for indulgent snacking. A delicious treat for any dessert table!
Graham cracker crumbs serve as the crust, providing a buttery, slightly sweet base that holds the bars together. Sweetened condensed milk is the secret to their chewy texture and rich sweetness.
In a medium bowl, combine the graham cracker crumbs, melted butter, and granulated sugar. Stir until evenly mixed, then press firmly into the pan to form the crust.
Sprinkle the milk chocolate chips evenly over the graham cracker crust.
Spread the mini marshmallows evenly across the chocolate layer.
Pour the sweetened condensed milk over the marshmallows and chocolate. Spread it gently to cover the entire surface.
Kitchen ApplianceKitchenAid Artisan Stand Mixer
Makes mixing crust ingredients effortless — a versatile appliance for baking enthusiasts.
Bake the bars in the oven for 20-25 minutes, or until the edges are golden and the marshmallows are puffed and lightly toasted.
Cool the pan completely at room temperature, then chill in the refrigerator for at least 1 hour to set the bars.
Slice into squares and serve chilled. Store leftovers in an airtight container in the refrigerator for up to one week.
The Origin of S’more Bars
S’more Bars are inspired by the quintessential American campfire dessert, s’mores. While the original s’more dates back to the early 20th century, these oven-baked bars modernize the treat, making it accessible for all seasons.
The name “s’more” is a contraction of “some more,” representing the sweet nostalgia tied to sharing desserts with loved ones. S’more Bars retain that charm while offering an easy way to enjoy the flavors at home.
If you’d like to freeze them, wrap each bar tightly with plastic wrap and place them in a freezer-safe bag. They can be frozen for up to three months and thawed overnight in the fridge before serving.
Reheat thawed bars in the microwave for 10-15 seconds if you’d like to enjoy them slightly warm and soft. Avoid overcooking during reheating, as the marshmallows may melt completely.
Frequently Asked Questions About S’more Bars
Can I use dark chocolate instead of milk chocolate? Yes, dark chocolate provides a richer flavor and pairs beautifully with the sweetness of the marshmallows.
Do I need to refrigerate the bars? Yes, refrigeration helps the bars firm up and ensures clean slices when cutting.
Can these be made ahead of time? Absolutely! Make them a day in advance and store them in the refrigerator until ready to serve.
Preheat your oven to 350°F (175°C) and lightly grease a 9x13-inch baking pan or line it with parchment paper for easy removal.
In a medium bowl, combine the graham cracker crumbs, melted butter, and granulated sugar. Mix until evenly combined, then press the mixture firmly into the bottom of the prepared baking pan to form the crust.
Sprinkle the milk chocolate chips evenly over the graham cracker crust.
Next, sprinkle the mini marshmallows evenly over the chocolate layer.
Pour the sweetened condensed milk evenly over the marshmallows and chocolate, making sure to cover as much of the surface as possible.
Bake the s'more bars in the preheated oven for 20-25 minutes, or until the edges are golden brown and the marshmallows are puffed and slightly toasted.
Remove the pan from the oven and allow the bars to cool completely at room temperature, then transfer to the refrigerator to chill for at least 1 hour to firm up.
Once chilled, slice the s'more bars into squares and serve. Store any leftovers in an airtight container in the refrigerator.
Notes
For a twist, try using dark chocolate chips or adding a sprinkle of sea salt on top before baking.
Calories: 250kcal
Cost: $10
Course: Dessert
Cuisine: American
Keyword: bars, dessert, s'mores
Loved this recipe? Save it to your favorite Pinterest board so you can easily find it later! ✨
This post contains affiliate links. As an Amazon Associate, I earn from qualifying purchases. This comes at no extra cost to you.
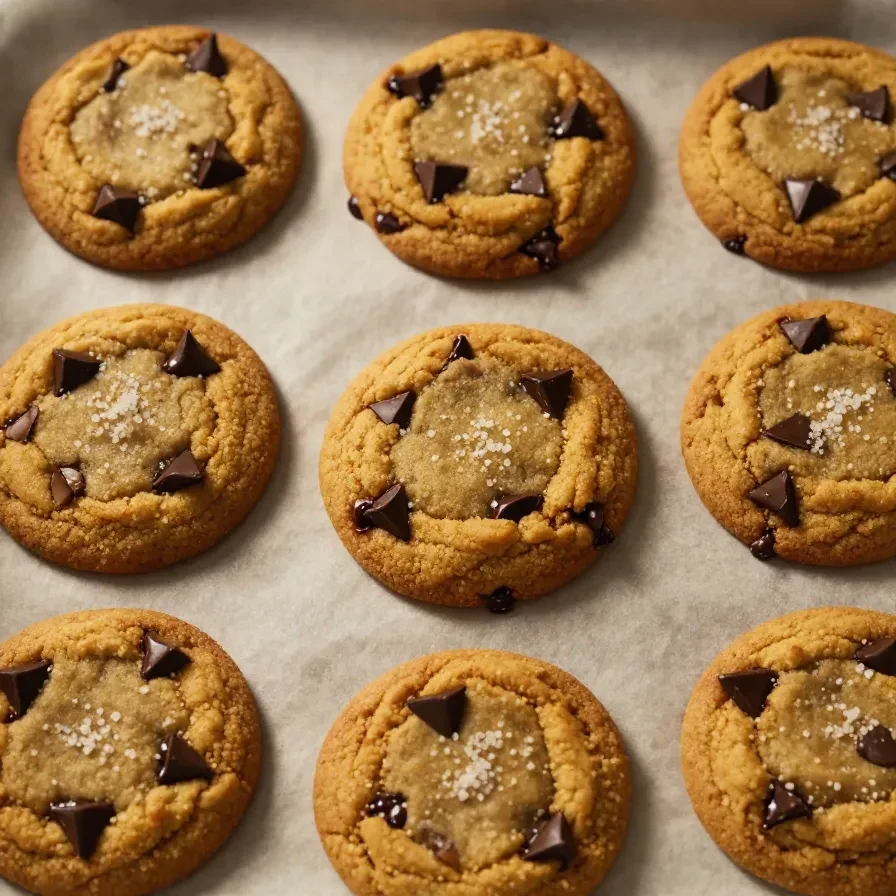
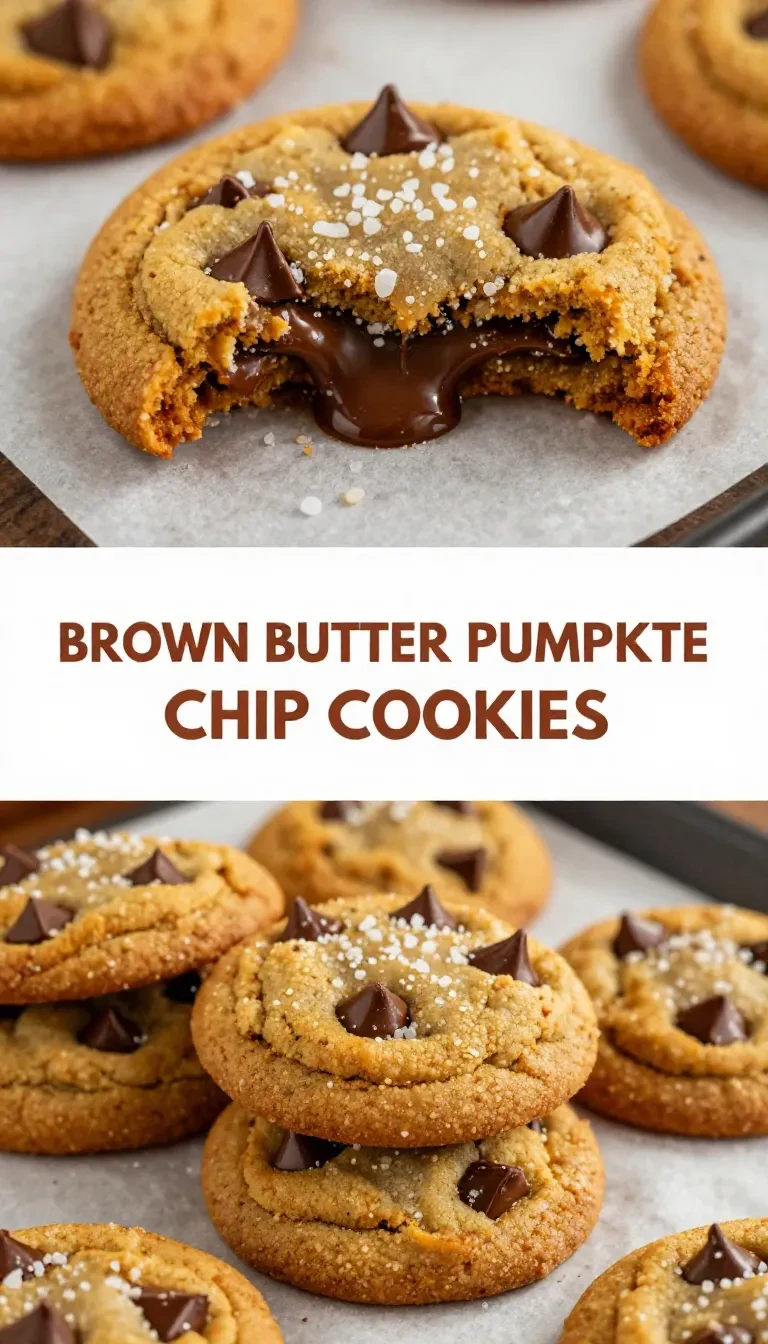
Brown Butter Pumpkin Chocolate Chip Cookies are a delightful blend of nutty, rich browned butter, warm pumpkin spices, and gooey chocolate chips. These cookies capture the essence of fall with their soft, chewy texture and cozy flavor profile. Perfectly spiced and indulgent, they’re ideal for holiday baking or relaxing weekends.
Why Brown Butter Pumpkin Chocolate Chip Cookies Stand Out
Brown butter adds deep, nutty richness that elevates the cookie’s flavor. Its complexity pairs beautifully with the warm spices and pumpkin puree.
The combination of cinnamon, nutmeg, and cloves creates a perfectly spiced cookie reminiscent of autumn. These spices harmonize to complement the sweetness and pumpkin flavor.
Pumpkin puree ensures the cookies stay moist and tender. It’s a secret weapon for achieving that soft texture without being overly dense.
Chocolate chips add a decadent touch to balance the earthy spice notes. Every bite marries pumpkin warmth with bursts of sweet chocolate.
Everything You Need for Brown Butter Pumpkin Chocolate Chip Cookies
The browned butter is the star ingredient here, giving the cookies their signature nutty aroma and rich flavor. Pumpkin puree not only adds moisture but also enhances the earthy undertones of the spices.
How To Make Brown Butter Pumpkin Chocolate Chip Cookies Step by Step
In a medium saucepan, melt the butter over medium heat, stirring frequently, until it turns golden brown and emits a nutty aroma. This should take about 5-7 minutes. Remove from heat and let cool slightly.
In a large mixing bowl, whisk together the pumpkin puree, granulated sugar, and brown sugar until smooth.
Add the browned butter, egg, and vanilla extract to the pumpkin mixture, and whisk until well combined.
In a separate bowl, whisk together the flour, baking soda, baking powder, salt, cinnamon, nutmeg, and cloves.
Gradually add the dry ingredients to the wet mixture, stirring until just combined. Avoid overmixing to keep the cookies tender.
Fold in the chocolate chips until evenly distributed throughout the dough.
Cover the dough and refrigerate for at least 30 minutes to allow it to firm up.
Preheat your oven to 350°F (175°C) and line baking sheets with parchment paper.
Using a tablespoon or cookie scoop, drop rounded spoonfuls of dough onto the prepared baking sheets, spacing them about 2 inches apart.
Bake the cookies in the preheated oven for 12-14 minutes, or until the edges are lightly golden and the centers are set.
Remove the cookies from the oven and let them cool on the baking sheets for 5 minutes before transferring them to a wire rack to cool completely.
A Brief History of Pumpkin in Baking
Pumpkin has long been a staple in fall-inspired baking, originating from Native American traditions where pumpkins were used for pies and puddings. Spices like cinnamon, nutmeg, and cloves eventually became paired with pumpkin during colonial times, creating the aromatic profile we now associate with fall desserts.
Kitchen ApplianceKitchenAid Artisan Stand Mixer
Makes mixing dough and batters effortless — a kitchen game-changer
Modern pumpkin cookies evolved from this tradition, combining pumpkin’s natural moisture with decadent ingredients like butter and chocolate to create irresistible baked treats.
Easy Ingredient Swaps for This Recipe
For a gluten-free version, substitute all-purpose flour with a 1-to-1 gluten-free baking mix. The texture may be slightly lighter, but the flavor remains intact.
Use dairy-free butter and chocolate chips to make the recipe suitable for those avoiding dairy. Coconut oil can replace butter, adding a mild tropical hint to the cookies.
If you’re out of canned pumpkin puree, mashed sweet potato works as a similar substitute. It offers comparable moisture and sweetness.
Common Mistakes to Avoid
Skipping the refrigeration step can lead to cookies that spread too much. Chilling ensures the dough holds its shape during baking.
Overmixing the dough may result in tough cookies. Stir just until the dry ingredients are fully incorporated to maintain a soft texture.
Not browning the butter properly can diminish the recipe’s flavor profile. Take your time to achieve that golden color and nutty aroma.
Serving Suggestions
Pair these cookies with a hot cup of spiced tea or coffee for a cozy afternoon treat. The bold spices complement warm beverages beautifully.
Serve alongside vanilla ice cream for a decadent dessert combination. The cold creaminess contrasts perfectly with the warm, chewy cookies.
Enjoy them with a glass of milk to enhance their rich chocolate and spice flavors. This classic pairing never goes out of style.
In a medium saucepan, melt the butter over medium heat, stirring frequently, until it turns golden brown and emits a nutty aroma. This should take about 5-7 minutes. Remove from heat and let cool slightly.
In a large mixing bowl, whisk together the pumpkin puree, granulated sugar, and brown sugar until smooth.
Add the browned butter, egg, and vanilla extract to the pumpkin mixture, and whisk until well combined.
In a separate bowl, whisk together the flour, baking soda, baking powder, salt, cinnamon, nutmeg, and cloves.
Gradually add the dry ingredients to the wet mixture, stirring until just combined. Avoid overmixing.
Fold in the chocolate chips until evenly distributed throughout the dough.
Cover the dough and refrigerate for at least 30 minutes to allow it to firm up.
Preheat your oven to 350°F (175°C) and line baking sheets with parchment paper.
Using a tablespoon or cookie scoop, drop rounded spoonfuls of dough onto the prepared baking sheets, spacing them about 2 inches apart.
Bake the cookies in the preheated oven for 12-14 minutes, or until the edges are lightly golden and the centers are set.
Remove the cookies from the oven and let them cool on the baking sheets for 5 minutes before transferring them to a wire rack to cool completely.
Notes
For extra flavor, you can add a pinch of ground ginger or use dark chocolate chips instead of semisweet.
Calories: 150kcal
Cost: $10
Course: Dessert
Cuisine: American
Keyword: Chocolate Chip Cookies, fall dessert, pumpkin cookies
Loved this recipe? Save it to your favorite Pinterest board so you can easily find it later! ✨
This post contains affiliate links. As an Amazon Associate, I earn from qualifying purchases. This comes at no extra cost to you.
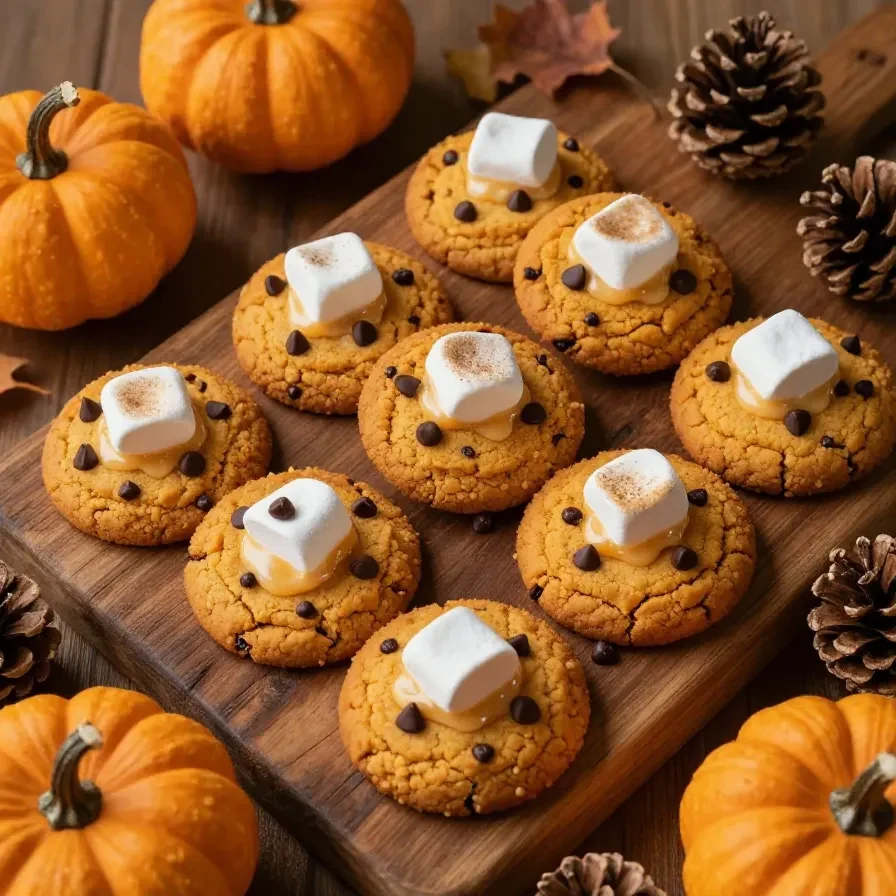
Pumpkin S’mores Cookies bring together the warm spices of fall and the nostalgic flavors of s’mores. Soft and chewy with hints of pumpkin spice, melted chocolate, gooey marshmallows, and crunchy graham crackers, these cookies are the perfect treat for seasonal gatherings or a sweet indulgence anytime. Their delightful combination of textures and flavors makes them a must-bake recipe for cookie lovers everywhere.
Combines fall flavors with classic s’mores elements for a one-of-a-kind cookie. The pumpkin spice adds warmth, while the gooey marshmallows and chocolate create a comforting treat.
Quick and easy to prepare, making them perfect for busy schedules or last-minute gatherings. You’ll only need half an hour from start to finish.
Ideal for sharing with loved ones or serving at holiday parties. These cookies are both visually appealing and universally loved for their nostalgic charm.
Customizable with pantry-friendly swaps. You can tweak the spices or chocolate for unique versions of this crowd favorite.
The balance of pumpkin puree and spices like cinnamon, nutmeg, and ginger is key for achieving that cozy fall flavor. Mini marshmallows and chocolate chips ensure every bite has a gooey and sweet component.
How to Make Pumpkin S’mores Cookies Step by Step
Preheat your oven to 350°F (175°C) and line baking sheets with parchment paper. This prevents sticking and ensures even baking.
In a large bowl, cream together the softened butter, granulated sugar, and brown sugar until light and fluffy. Proper creaming helps create soft yet structured cookies.
Mix in the pumpkin puree and vanilla extract until well combined. The pumpkin keeps the cookies moist and adds natural sweetness.
In a separate bowl, whisk together the all-purpose flour, baking soda, baking powder, cinnamon, nutmeg, ginger, and salt.
Gradually add the dry ingredients into the wet ingredients, mixing until a soft dough forms. Avoid overmixing to ensure a tender texture.
Fold in the mini chocolate chips, mini marshmallows, and crushed graham crackers until evenly distributed.
Scoop tablespoon-sized portions of dough and place them onto the prepared baking sheets, spacing them about 2 inches apart.
Bake for 10-12 minutes, or until the edges are set and the marshmallows are golden and gooey.
Allow the cookies to cool on the baking sheets for 5 minutes before transferring them to a wire rack to cool completely.
Kitchen ApplianceKitchenAid Artisan Stand Mixer
Makes mixing dough and batters effortless — a kitchen game-changer.
If you don’t have graham crackers, substitute crushed digestive biscuits for a similar flavor and texture.
Swap mini chocolate chips with dark chocolate chunks for a richer taste. This pairs particularly well with the pumpkin and spices.
No mini marshmallows? Cut large marshmallows into smaller pieces or use marshmallow fluff, though the texture will vary slightly.
Expert Baking Tips to Perfect Your Cookies
Use room-temperature butter for creaming—it traps air for lighter cookies. Cold butter won’t blend as smoothly.
Rest the dough in the fridge for 15 minutes before baking to prevent spreading. This is especially helpful for the marshmallows to stay intact.
Line your baking sheet with parchment paper to ensure easy removal and cleanup.
Monitor baking closely—pull the cookies out once the marshmallows are golden for the perfect texture balance of gooey and chewy.
How to Store and Reheat Pumpkin S’mores Cookies
Store Pumpkin S’mores Cookies in an airtight container at room temperature for up to 3 days. For longer storage, refrigerate them for up to a week or freeze for up to 3 months.
To reheat, place cookies in a 300°F oven for 3-5 minutes to revive their gooey filling and crisp edges. Avoid microwaving as it can make the marshmallows too sticky.
This post contains affiliate links. As an Amazon Associate, I earn from qualifying purchases. This comes at no extra cost to you.
Soft Batch Pumpkin Chocolate Chip Cookies
Soft Batch Pumpkin Chocolate Chip Cookies are a perfect treat for fall, featuring a moist and tender texture, warm autumn spices, and bursts of semi-sweet chocolate in each bite. The pumpkin puree makes these cookies soft and melt-in-your-mouth delicious, while hints of cinnamon, nutmeg, and cloves enhance their comforting flavors. They bake quickly, making them an irresistible option for busy holiday mornings or cozy evenings at home.
The pumpkin puree creates a soft, moist texture that elevates these cookies beyond traditional chocolate chip cookies, making them ideal for anyone who loves tender baked goods.
Warm spices like cinnamon, nutmeg, and cloves bring a classic autumn flavor that pairs perfectly with the chocolate chips, making these cookies quintessential fall treats.
Quick preparation allows you to whip up a batch in under 30 minutes, perfect for busy schedules or last-minute gatherings.
They stay soft for days, making them excellent for meal prepping desserts or sharing during the holiday season.
Everything You Need for Soft Batch Pumpkin Chocolate Chip Cookies
The canned pumpkin puree is the cornerstone of this recipe, offering both moisture and flavor. Combining it with warm spices gives the cookies their signature autumn profile.
How To Make Soft Batch Pumpkin Chocolate Chip Cookies Step by Step
Preheat your oven to 350°F (175°C) and line two baking sheets with parchment paper or silicone baking mats.
In a large mixing bowl, cream together the softened butter, granulated sugar, and light brown sugar until light and fluffy, about 2-3 minutes using a hand mixer or stand mixer.
Add the canned pumpkin puree, egg, and vanilla extract to the butter mixture, and beat until well combined.
Kitchen ApplianceKitchenAid Artisan Stand Mixer
Makes mixing dough and batters effortless — a kitchen game-changer for cookie recipes.
In a separate bowl, whisk together the all-purpose flour, baking soda, baking powder, ground cinnamon, ground nutmeg, ground cloves, and salt.
Gradually add the dry ingredients to the wet ingredients, mixing until just combined. Avoid overmixing to prevent tough cookies.
Fold in the semi-sweet chocolate chips using a spatula or wooden spoon.
Scoop the dough onto the prepared baking sheets using a tablespoon or cookie scoop, spacing them about 2 inches apart.
Bake the cookies in the preheated oven for 10-12 minutes, or until the edges are set and the centers look slightly soft. Do not overbake to keep them tender.
Allow the cookies to cool on the baking sheets for 5 minutes, then transfer them to a wire rack to cool completely.
Serving Ideas for Soft Batch Pumpkin Chocolate Chip Cookies
Pair with a cozy mug of hot chocolate for the ultimate fall indulgence.
Serve alongside whipped cream-topped pumpkin spice lattes for a seasonal dessert-and-drink combo that’s always in demand.
Enjoy them as a sweet side dish to a hearty soup or chili to balance out a savory meal.
Package them in decorative tins or gift bags for a thoughtful homemade holiday gift.
Common Mistakes to Avoid
Overmixing the dough can lead to dense cookies — mix only until the ingredients are just combined.
Skipping the parchment paper or silicone mats may cause sticking or uneven baking; always line your sheets.
Overbaking is a common mistake that dries out the texture. Remove the cookies when the edges are set but the centers are still slightly soft.
The Origin of Pumpkin Cookies
Pumpkin cookies trace their roots back to classic American autumn baking traditions, where seasonal ingredients like pumpkin and warm spices were showcased. Popularized during the 20th century alongside the rise of canned pumpkin, these cookies became a symbol of fall gatherings and holiday feasts.
Meal Prep, Storage, and Reheating
To store these cookies, place them in an airtight container at room temperature for up to 5 days. For longer storage, freeze them in a single layer on a tray before transferring to freezer-safe bags for up to 3 months.
Reheat frozen cookies by letting them thaw at room temperature, then warming in the oven at 300°F (150°C) for 3 minutes to restore their soft texture. They’re just as tender and flavorful as freshly baked!
Preheat your oven to 350°F (175°C) and line two baking sheets with parchment paper or silicone baking mats.
In a large mixing bowl, cream together the softened butter, granulated sugar, and light brown sugar until light and fluffy, about 2-3 minutes using a hand mixer or stand mixer.
Add the canned pumpkin puree, egg, and vanilla extract to the butter mixture, and beat until well combined.
In a separate bowl, whisk together the all-purpose flour, baking soda, baking powder, ground cinnamon, ground nutmeg, ground cloves, and salt.
Gradually add the dry ingredients to the wet ingredients, mixing until just combined. Avoid overmixing.
Fold in the semi-sweet chocolate chips using a spatula or wooden spoon.
Scoop the dough onto the prepared baking sheets using a tablespoon or cookie scoop, spacing them about 2 inches apart.
Bake the cookies in the preheated oven for 10-12 minutes, or until the edges are set and the centers look slightly soft. Do not overbake to keep them soft and moist.
Allow the cookies to cool on the baking sheets for 5 minutes, then transfer them to a wire rack to cool completely.
Notes
For extra flavor, consider adding a pinch of ginger or using dark chocolate chips instead of semi-sweet.
Calories: 120kcal
Cost: $8
Course: Dessert
Cuisine: American
Keyword: Chocolate Chip Cookies, fall baking, pumpkin cookies
Loved this recipe? Save it to your favorite Pinterest board so you can easily find it later! ✨
This post contains affiliate links. As an Amazon Associate, I earn from qualifying purchases. This comes at no extra cost to you.
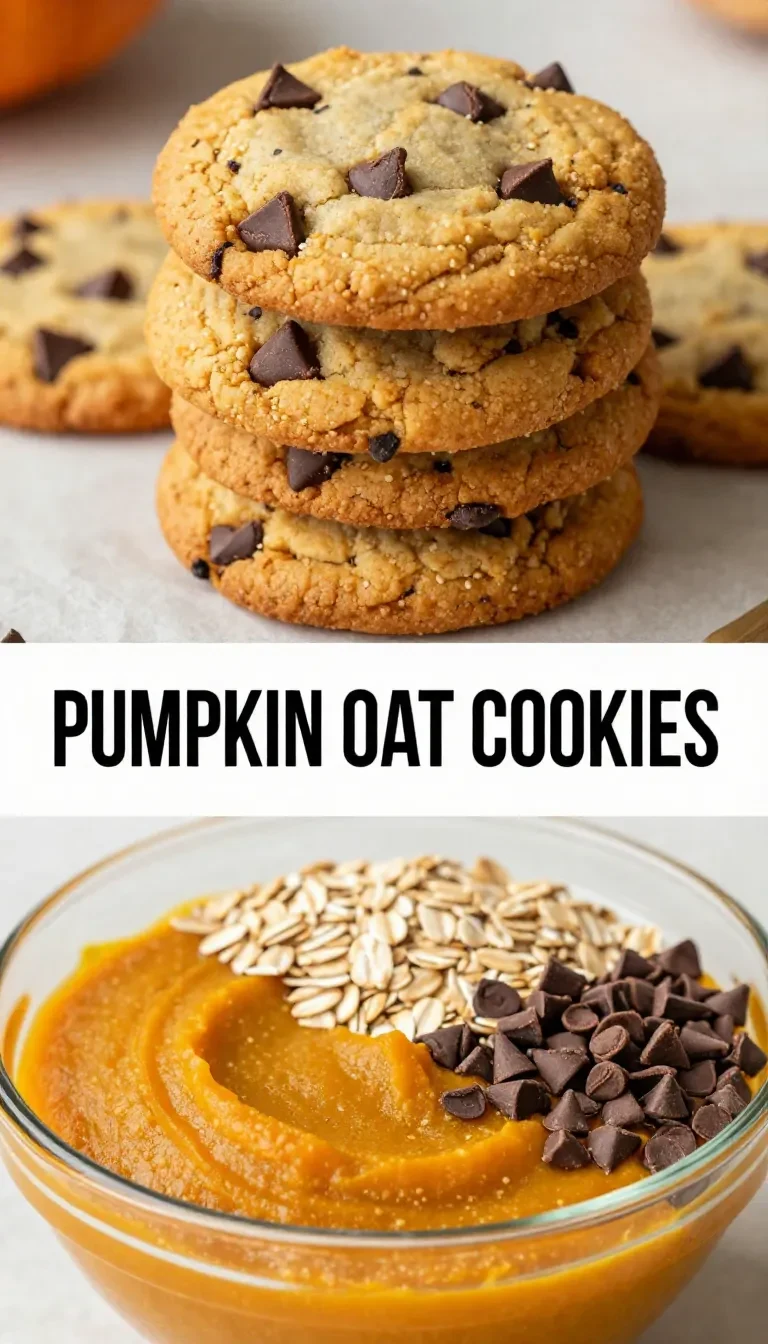
Healthy Pumpkin Oat Cookies Recipe
Healthy Pumpkin Oat Cookies are soft, chewy, and packed with the warm spices of cinnamon, nutmeg, and ginger. Made with wholesome ingredients like rolled oats, pumpkin puree, and almond butter, they make a perfect guilt-free treat or snack. Optional add-ins like dark chocolate chips or chopped nuts add texture and richness to every bite.
These cookies bake up in under 20 minutes and are naturally sweetened for a healthier indulgence. Whether you enjoy them with a warm drink or as a quick pick-me-up, their cozy flavors scream fall with every bite.
They are naturally sweetened with honey or maple syrup, which keeps the sugar content low while adding depth of flavor. This makes them perfect for clean eating pumpkin treats that satisfy your sweet tooth without guilt.
The combination of pumpkin puree and rolled oats delivers a soft, chewy texture that feels comforting and indulgent. You won’t miss the butter or refined sugar in these healthy pumpkin oatmeal cookies.
Quick to make with minimal prep, this pumpkin cookie recipe is easy enough for beginner bakers or busy families. You’ll have a batch of homemade cookies ready in just 25 minutes.
Optional mix-ins like dark chocolate chips or chopped nuts add versatility, allowing you to customize flavors and textures for your unique preferences. Perfect for snack time, lunchboxes, or sharing with loved ones.
Everything You Need for Healthy Pumpkin Oat Cookies
Pumpkin puree adds natural moisture and a hint of earthiness, while almond butter provides creaminess and a nutty undertone. Rolled oats create the chewy structure of these cookies, making them hearty and satisfying.
How To Make Healthy Pumpkin Oat Cookies Step by Step
Preheat your oven to 350°F (175°C) and line a baking sheet with parchment paper. This ensures the cookies won’t stick and makes cleanup easier.
In a large mixing bowl, combine the rolled oats, pumpkin puree, almond butter, honey (or maple syrup), and vanilla extract. Mix everything together until smooth and uniformly combined.
Add the ground cinnamon, nutmeg, ginger, and salt to the mixture. Stir thoroughly to distribute the spices evenly throughout the dough.
If desired, fold in dark chocolate chips and/or chopped nuts for additional flavor and texture. Mix lightly to avoid overworking the dough.
Kitchen ApplianceKitchenAid Artisan Stand Mixer
Makes mixing dough and batters effortless — a kitchen game-changer.
Using a spoon or cookie scoop, drop small spoonfuls of the dough onto the prepared baking sheet. Flatten each scoop slightly with the back of the spoon to shape them into cookies.
Bake in the preheated oven for 12-15 minutes, or until the cookies are set and slightly golden around the edges. Be careful not to overbake to maintain their soft and chewy texture.
Remove the cookies from the oven and let them cool on the baking sheet for 5 minutes before transferring to a wire rack. This helps them firm up while cooling completely.
Smart Ingredient Swaps to Try
For a vegan option, replace honey with maple syrup and use a plant-based nut butter. This keeps the pumpkin oatmeal cookies dairy-free and healthy.
To make these cookies gluten-free, opt for certified gluten-free rolled oats. The recipe remains identical in flavor and texture while accommodating dietary restrictions.
Once baked, store Healthy Pumpkin Oat Cookies in an airtight container at room temperature for up to 3 days. For longer storage, refrigerate them for up to a week.
To freeze, arrange cooled cookies in a single layer on a baking sheet, then transfer them to a freezer-safe bag or container after they’re frozen solid. They can be stored for up to 2 months.
Reheat frozen cookies in the microwave for 10-20 seconds or let them thaw at room temperature. Their texture remains soft and chewy after reheating.
Preheat your oven to 350°F (175°C) and line a baking sheet with parchment paper.
In a large mixing bowl, combine the rolled oats, pumpkin puree, almond butter, honey (or maple syrup), and vanilla extract. Mix until well combined.
Add the cinnamon, nutmeg, ginger, and salt to the mixture. Stir until the spices are evenly incorporated.
If desired, fold in the dark chocolate chips and/or chopped nuts for added texture and flavor.
Using a spoon or cookie scoop, drop spoonfuls of the mixture onto the prepared baking sheet. Flatten slightly with the back of the spoon to form cookie shapes.
Bake in the preheated oven for 12-15 minutes, or until the cookies are set and slightly golden around the edges.
Remove the cookies from the oven and allow them to cool on the baking sheet for 5 minutes before transferring to a wire rack to cool completely.
Notes
You can substitute almond butter with peanut butter or sunflower seed butter. For a vegan option, use maple syrup instead of honey.
Calories: 120kcal
Cost: $5
Course: Dessert, Snack
Cuisine: American
Keyword: Healthy Dessert, oat cookies, pumpkin
Loved this recipe? Save it to your favorite Pinterest board so you can easily find it later! ✨
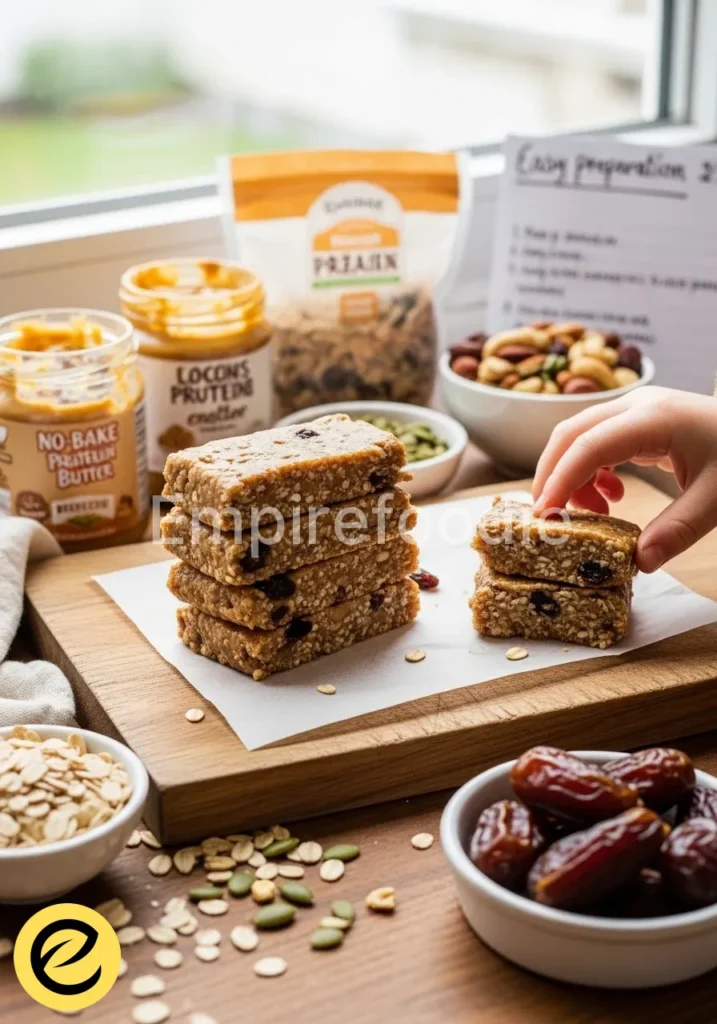
There’s something incredibly grounding about a wholesome snack made with love, much like the cherished recipes passed down through generations. These delightful no-bake protein bars bring a taste of home to your busy days, offering a perfect blend of rich, chewy texture and satisfying sweetness.
Crafted with simple, pure ingredients, these protein bars are not just a treat for your taste buds but a genuine boost for your well-being, keeping you energized throughout your day. Imagine a bite that transports you back to grandma’s kitchen, yet perfectly fits into your modern, active life.
Table of Contents
Why You’ll Love These Homemade Protein Bars
These truly exceptional protein bars offer everything you desire in a healthy, convenient snack. You will adore them for their:
Unmatched Flavor & Texture: A delightful combination of nutty, sweet, and perfectly chewy, reminiscent of classic farmhouse treats.
Effortless Preparation: No baking required! Just mix, press, and chill for quick, delicious protein bars.
Wholesome Goodness: Packed with natural protein, fiber, and healthy fats to fuel your body and mind.
Customizable Appeal: Easily adapt ingredients to suit your dietary needs and personal preferences, making these the best protein bars for everyone.
Ingredients You’ll Need
To create these wonderful protein bars, focusing on quality ingredients makes all the difference. Just like my grandmother always said, “Good food starts with good things from the earth.”
1 ½ cups (180g) Rolled Oats: Opt for old-fashioned rolled oats, not instant. They provide the perfect chewy texture and a boost of fiber.
1 cup (100g) Vanilla Protein Powder: Choose a high-quality whey or plant-based protein powder. This is the core of our protein bars.
½ cup (60g) Ground Flaxseed: A nutritional powerhouse, adding omega-3s, fiber, and helping to bind our protein bars.
½ cup (120g) Nut Butter: Creamy peanut butter or almond butter works beautifully. Ensure it’s natural, with no added sugars or oils.
½ cup (120g) Honey or Maple Syrup: For natural sweetness and binding. Adjust to your preferred sweetness level.
¼ cup (60ml) Almond Milk (or any milk): Use unsweetened milk to control sweetness. You might need a little more or less to achieve the right consistency.
1 teaspoon Vanilla Extract: A splash of good quality vanilla deepens the flavor profile, a trick my grandmother always used.
¼ cup (30g) Mini Chocolate Chips (optional): Dark chocolate chips add a lovely touch without overwhelming the healthy nature of these protein bars.
Pinch of Sea Salt: Balances the sweetness and enhances all the other flavors.
Part of the joy of farmhouse baking is adapting to what you have on hand and tailoring recipes to fit every family member’s needs. These protein bars are incredibly versatile, allowing for many healthy swaps. If peanut allergies are a concern, swap peanut butter for sunflower seed butter or almond butter.
For a vegan option, ensure your protein powder is plant-based and use maple syrup instead of honey. You can also experiment with different nuts or seeds; try adding a handful of chopped walnuts or chia seeds for extra crunch and nutrients.
To boost the flavor and nutrient profile, consider incorporating a tablespoon of unsweetened shredded coconut or a sprinkle of cinnamon. These simple variations ensure your homemade protein bars always feel fresh and exciting, catering to all tastes while maintaining their wholesome integrity.
Experimenting with your protein bar ingredients can lead to fantastic results. If you’re looking for more ways to enjoy chocolate, don’t miss our delicious chocolate biscuits recipe that complements any sweet cravings.
Equipment You’ll Need
You won’t need anything fancy for these protein bars, just a few kitchen basics that every good home cook has.
Large Mixing Bowl
Sturdy Spatula or Wooden Spoon
8×8 inch (20×20 cm) Baking Dish or Casserole Dish
Parchment Paper
Measuring Cups and Spoons
Step-by-Step Instructions
Making these protein bars is a simple, satisfying process that yields delicious results every time. Just follow these steps, and you’ll have a batch of wholesome snacks ready to go.
Prepare Your Dish: Line an 8×8 inch baking dish with parchment paper, leaving an overhang on the sides. This makes it much easier to lift out your finished protein bars later. A little preparation goes a long way, just like setting the table before a big family meal.
Combine Dry Ingredients: In your large mixing bowl, combine the rolled oats, protein powder, ground flaxseed, and a pinch of sea salt. Use your spatula to mix everything thoroughly. You want all the dry ingredients evenly distributed to ensure every bite of your protein bars is perfectly balanced.
Warm Wet Ingredients (Optional but Recommended): In a small saucepan or microwave-safe bowl, gently warm the nut butter and honey (or maple syrup) over low heat until just melted and smooth. This step makes mixing much easier and helps the protein bars bind better. My grandmother always said warming the fats helped everything come together more lovingly. Add the vanilla extract to this mixture.
Combine Wet and Dry: Pour the warm wet ingredient mixture into the bowl with your dry ingredients. Add the almond milk. Mix vigorously with your sturdy spatula or wooden spoon until everything is thoroughly combined and forms a thick, cohesive dough. The mixture for these protein bars should be sticky and hold together when pressed. If it feels too dry, add a little more milk, one tablespoon at a time, until the desired consistency is reached.
Fold in Chocolate Chips (Optional): If you’re using mini chocolate chips, fold them into the mixture now. Ensure they are evenly distributed throughout the protein bars.
Press into Dish: Transfer the mixture into your prepared 8×8 inch dish. Using the back of your spatula or your clean hands, press the mixture down firmly and evenly into the pan. You want a compact, smooth layer for perfectly formed protein bars. Apply good, steady pressure, just like tamping down soil in a garden bed.
Chill: Cover the dish with plastic wrap and refrigerate for at least 2 hours, or until the protein bars are firm enough to cut. Chilling is crucial for stability.
Cut and Serve: Once firm, lift the parchment paper to remove the slab from the dish. Place it on a cutting board and cut it into 12-16 equally sized protein bars. Enjoy immediately or store for later!
Preparing your dish with care ensures a seamless baking experience and delightful results. For a similar treat, you might want to check out our simple and delicious chocolate chip biscuits recipe.
Pro Tips for Success
Achieving truly excellent protein bars often comes down to a few small, thoughtful details. These tips, gleaned from years in the kitchen, will elevate your snack game.
Don’t Over-Process Oats: While some recipes call for pulsing oats, resist the urge. Keeping them whole provides superior texture and a satisfying chew in your protein bars.
Achieve the Right Consistency: The mixture should be firm enough to press but not crumbly. If it’s too dry, add milk slowly. If too wet, a tablespoon of extra protein powder or ground flaxseed can help. Consistency is key for perfect protein bars.
Press Firmly: When pressing the mixture into the pan, use significant pressure. This compacts the protein bars, preventing them from crumbling when cut and ensuring a dense, satisfying bite.
Chill Thoroughly: Do not rush the chilling process. A minimum of 2 hours, or even overnight, in the refrigerator ensures the protein bars set properly and are easy to cut cleanly. This also improves their overall texture.
Quality Ingredients Matter: Especially with protein powder and nut butter, invest in good quality brands. The flavor and texture of your finished protein bars directly reflect the quality of your ingredients.
Storage & Reheating Tips
Proper storage ensures your homemade protein bars stay fresh and delicious, ready for whenever hunger strikes. Keep them in an airtight container in the refrigerator for up to 1-2 weeks. You can also wrap individual protein bars in plastic wrap or parchment paper before storing them, which makes grabbing a quick snack even easier.
For longer storage, these protein bars freeze beautifully. Place them in a freezer-safe bag or container, separated by parchment paper, and they will keep for up to 3 months. Thaw frozen protein bars overnight in the refrigerator or simply let them sit at room temperature for about 15-30 minutes before enjoying. No reheating is necessary; these are perfect straight from the fridge or freezer.
To maintain the freshness and flavor of your protein bars, proper storage is key. For more indulgent ideas, explore our peanut butter bars, which are a perfect snack to grab on the go.
What to Serve With This Recipe
These protein bars are substantial enough to be a standalone snack, but they also pair wonderfully with other wholesome options to create a more complete meal or boost your energy further.
Fresh Fruit: A crisp apple, a handful of berries, or a sliced banana complements the richness of the protein bars beautifully, adding natural sweetness and extra vitamins.
Greek Yogurt: A dollop of plain Greek yogurt alongside your protein bar offers an additional protein punch and a creamy contrast.
A Warm Beverage: Pair a protein bar with a steaming mug of herbal tea or a comforting cup of coffee for a perfect morning or afternoon pick-me-up.
Smoothie: For an ultimate energy boost, enjoy your protein bars with a green smoothie packed with spinach, fruit, and plant-based milk.
Nut Milk: A glass of almond milk or oat milk makes a simple, satisfying accompaniment to these protein bars.
Frequently Asked Questions (FAQ)
Can I use a different type of protein powder?
Absolutely! The type of protein powder you use can certainly impact the final texture and flavor of your protein bars. Whey protein tends to yield a chewier, denser bar, while plant-based proteins like pea or brown rice protein might result in a slightly drier or more crumbly texture.
You might need to adjust the amount of liquid (almond milk) slightly, adding a tablespoon at a time until the mixture for your protein bars reaches the desired consistency. Always choose a protein powder you enjoy the taste of, as it forms a significant part of the overall flavor profile of these protein bars.
How can I make these protein bars vegan?
Making these protein bars vegan is quite straightforward. First, ensure you select a plant-based protein powder, such as pea, soy, or brown rice protein. Next, substitute honey with an equal amount of pure maple syrup or agave nectar.
Both options provide excellent binding and sweetness. Finally, confirm your chocolate chips (if using) are dairy-free. With these simple adjustments, you can enjoy delicious, entirely plant-based protein bars that are just as satisfying and nutritious.
What if my mixture is too dry or too wet?
Achieving the perfect consistency for these no-bake protein bars is crucial for them to hold together well. If your mixture feels too dry and crumbly, slowly add more almond milk, one tablespoon at a time, mixing well after each addition until the mixture comes together and is firm enough to press without falling apart. Conversely, if the mixture is too wet and sticky, add a tablespoon or two of extra ground flaxseed or even a little more protein powder.
These ingredients absorb moisture and will help firm up your protein bars. Adjust gradually until you reach a consistency that is easy to press into your dish.
Protein bars are a popular nutritional snack that can provide a concentrated source of protein, making them ideal for athletes and busy individuals alike. These convenient bars are often made with a mixture of protein sources, oats, nuts, and other healthy ingredients, giving you fuel for your day, especially when you need a quick meal on the go. Learn more about their nutritional value through this resource.
Final Thoughts
These wholesome protein bars carry more than just nutrients; they hold a whisper of the past, a connection to the simple, honest nourishment my grandmothers championed. Each chewy bite is a testament to the power of pure ingredients and the enduring comfort of a homemade snack. Make them for your family, and share a taste of tradition, infused with love.
These no-bake protein bars are a wholesome snack made with love, featuring a rich, chewy texture and satisfying sweetness. Crafted with simple, pure ingredients, they provide a genuine boost for your well-being, perfect for busy days.
Ingredients
1 ½ cups (180g) Rolled Oats
1 cup (100g) Vanilla Protein Powder
½ cup (60g) Ground Flaxseed
½ cup (120g) Nut Butter
½ cup (120g) Honey or Maple Syrup
¼ cup (60ml) Almond Milk
1 teaspoon Vanilla Extract
¼ cup (30g) Mini Chocolate Chips (optional)
Pinch of Sea Salt
Instructions
Prepare Your Dish: Line an 8×8 inch baking dish with parchment paper, leaving an overhang on the sides.
Combine Dry Ingredients: In a large mixing bowl, combine the rolled oats, protein powder, ground flaxseed, and a pinch of sea salt.
Warm Wet Ingredients (Optional): Gently warm the nut butter and honey (or maple syrup) over low heat until just melted and smooth, then add vanilla extract.
Combine Wet and Dry: Pour the warm wet mixture into the dry ingredients, adding almond milk, and mix vigorously until a thick dough forms.
Fold in Chocolate Chips (Optional): If using, fold in mini chocolate chips until distributed evenly.
Press into Dish: Transfer the mixture into the prepared dish, pressing down firmly and evenly.
Chill: Cover with plastic wrap and refrigerate for at least 2 hours until firm.
Cut and Serve: Once firm, lift out of the dish using the parchment paper, cut into bars, and enjoy.
Notes
Store in an airtight container in the refrigerator for up to 1-2 weeks. Freeze for longer storage.Adjust liquid to achieve desired consistency.Use quality ingredients for best results.