Crafting exceptional homemade milk chocolate bars demystifies a often-complex confectionery art, transforming raw ingredients into a rich, creamy, and satisfying indulgence. This precise guide explores the scientific principles behind perfect texture and flavor, ensuring your homemade milk chocolate bars possess that distinct snap and smooth melt. Understanding the molecular interactions involved elevates your culinary prowess, allowing you to achieve professional-grade results right in your kitchen. Prepare to master the fundamental techniques for creating irresistible milk chocolate bars.
Table of Contents
Why You’ll Love These Homemade Milk Chocolate Bars
- Superior Flavor Profile: Achieve a customizable sweetness and profound cocoa notes, far exceeding commercial milk chocolate bars.
- Precise Texture Control: Master tempering to ensure a perfect snap and velvety smooth mouthfeel every time.
- Ingredient Transparency: Know exactly what goes into your delectable milk chocolate bars, free from obscure additives.
- Engaging Culinary Science: Delve into the fascinating chemistry of chocolate making, demystifying complex processes.
Ingredients You’ll Need
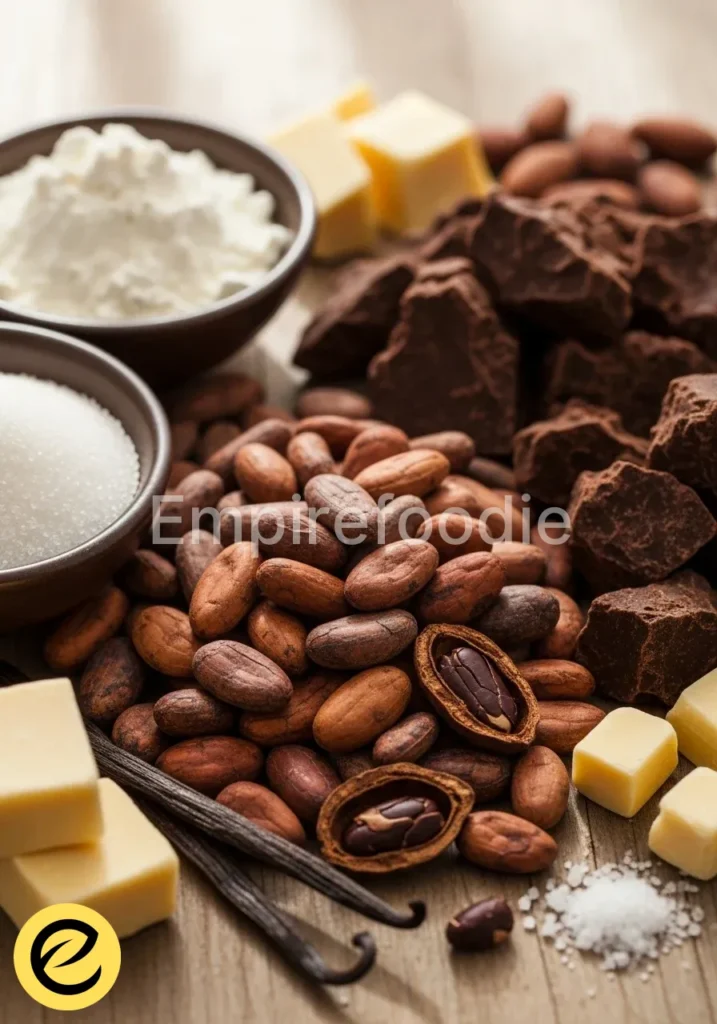
The quality of your ingredients fundamentally dictates the outcome of your milk chocolate bars. Opt for high-grade cocoa products and dairy for optimal flavor and texture.
- 150g (5.3 oz) Cocoa Butter: This forms the structural fat matrix. High-quality cocoa butter, deodorized or natural, provides the necessary fluidity and contributes to the signature melt-in-your-mouth experience of milk chocolate bars. Its specific crystalline structure is crucial for proper tempering.
- 50g (1.8 oz) Cocoa Mass (or Unsweetened Chocolate): Providing the intense cocoa solids, this ingredient contributes the fundamental chocolate flavor. Its bitterness balances the sweetness and creaminess, essential for complex milk chocolate bars.
- 150g (5.3 oz) Whole Milk Powder: Essential for the creamy, milky flavor and characteristic light color of milk chocolate. The fat content in whole milk powder also enhances the mouthfeel. Ensure it is fresh and free from clumps.
- 120g (4.2 oz) Granulated Sugar (Caster Sugar Recommended): Fine granulated sugar dissolves more readily, contributing to a smoother texture without grittiness. Sugar not only sweetens but also plays a role in the chocolate’s rheology. Adjust to personal preference for sweeter or less sweet milk chocolate bars.
- ½ teaspoon Vanilla Extract (or Vanilla Bean Paste): Aromatic compounds in vanilla enhance the overall flavor profile, adding depth and complexity. Use a high-quality pure extract for best results.
- ¼ teaspoon Sunflower Lecithin (Optional but Recommended): As an emulsifier, lecithin reduces the viscosity of the chocolate, making it easier to work with and improving the final texture. It helps distribute fat and solids uniformly, preventing fat bloom in your milk chocolate bars.
- Pinch of Salt: A small amount of salt enhances the perceived sweetness and rounds out the chocolate’s flavor.
Substitutions & Variations
[ra_display_video url=”https://www.youtube.com/watch?v=h8FwM-B7fIM”]
While the core recipe yields classic milk chocolate bars, thoughtful modifications can customize the nutritional profile or flavor without compromising scientific integrity. Substituting certain components alters the chemical and physical properties, so precise execution remains paramount.
- Sugar Alternatives: For reduced sugar milk chocolate bars, erythritol or allulose can replace granulated sugar. Be aware that these alternatives may affect the melting point and require slight adjustments to tempering temperatures. Always use powdered forms to avoid grittiness.
- Dairy-Free Options: Coconut milk powder or oat milk powder can substitute whole milk powder for dairy-free milk chocolate bars. These alternatives will subtly alter the flavor and require careful incorporation due to differing fat and protein compositions. The final texture may be slightly different.
- Flavor Inclusions: Once tempered, stir in roasted chopped nuts, dried fruit bits, or a hint of orange zest just before pouring into molds. Ensure inclusions are completely dry to prevent moisture-induced seizing.
- Enhanced Cocoa Intensity: Slightly increase the cocoa mass and reduce sugar for a darker, more intense flavor profile in your milk chocolate bars, leaning towards a “dark milk” style.
While crafting milk chocolate bars, you can enhance your experience by exploring other delightful recipes like the best chocolate biscuits. These treats can accompany your chocolate bars for an elevated dessert experience.
Equipment You’ll Need
Precision equipment is vital for successful chocolate making, particularly for achieving proper tempering and smooth texture.
- Double Boiler Setup: Essential for gentle, even heating of chocolate, preventing scorching. A heatproof bowl over a simmering pot of water works perfectly.
- Accurate Digital Thermometer: Critical for monitoring tempering temperatures with precision. An instant-read thermometer is ideal.
- Silicone Spatulas: For scraping and mixing, preventing any material waste.
- Fine Mesh Sieve: To sift milk powder and sugar, ensuring no lumps create a gritty texture in your milk chocolate bars.
- Chocolate Molds (Polycarbonate or Silicone): To shape your milk chocolate bars. Polycarbonate molds yield a glossy finish; silicone is easier for demolding.
- Parchment Paper or Silicone Mat: For cooling and working surface.
- High-Speed Blender or Food Processor (Optional but Recommended): For refining the chocolate further if a smoother texture is desired, especially after initial mixing. This helps reduce particle size.
Step-by-Step Instructions

Adherence to temperature and technique is non-negotiable for producing exquisite milk chocolate bars. Each step is designed to optimize crystallization and flavor development.
- Prepare Ingredients: Precisely weigh all your ingredients. Sift the whole milk powder and granulated sugar separately through a fine-mesh sieve. This prevents clumps and ensures a silky texture for your milk chocolate bars.
- Melt Cocoa Butter: Set up your double boiler. Gently melt the cocoa butter in the heatproof bowl over simmering water, ensuring no water or steam comes into contact with the butter. Heat to approximately 45-50°C (113-122°F).
- Incorporate Cocoa Mass: Add the cocoa mass (or unsweetened chocolate) to the melted cocoa butter. Stir continuously until fully melted and combined. Maintain the temperature, allowing the cocoa mass to fully homogenize into the fat phase.
- Add Dry Ingredients: Gradually whisk in the sifted milk powder, then the sifted sugar, followed by the pinch of salt. Stir vigorously to combine, ensuring no lumps remain. At this stage, the mixture will be thick and paste-like.
- Refine and Heat: If using, carefully transfer the mixture to a high-speed blender or food processor. Process for 2-5 minutes to further reduce particle size, creating a smoother consistency. Alternatively, continue stirring thoroughly. Return the mixture to the double boiler and heat the chocolate to an initial tempering temperature of 45-50°C (113-122°F). Stir in the vanilla extract and lecithin (if using). This initial heating phase melts all cocoa butter crystals.
- Cool and Seed (Tempering): Remove the bowl from the double boiler. Allow the chocolate to cool to 27°C (81°F), stirring frequently. This is the cooling phase where unstable cocoa butter crystals begin to form. For seeding, add a small amount (approximately 10-20g) of finely chopped pre-tempered milk chocolate bars or cocoa butter to the mixture once it reaches 32-34°C (90-93°F). This introduces stable beta crystals. Continue stirring until the entire mixture reaches 27°C (81°F).
- Reheat to Working Temperature: Briefly return the chocolate over the warm (but not simmering) water of the double boiler for just a few seconds, or use a heat gun, to gently raise the temperature to 29-30°C (84-86°F) for milk chocolate. This melts any unstable crystals, leaving only the desired stable beta crystals. Test for temper by dipping a knife or parchment paper strip; it should set within 3-5 minutes with a glossy finish and snap.
- Mold the Milk Chocolate Bars: Pour the tempered chocolate into your clean, dry molds. Tap the molds gently on the counter to release any trapped air bubbles.
- Chill and Set: Transfer the molds to a cool, dry place (ideally 18-20°C / 64-68°F) or a refrigerator for 15-30 minutes until fully set and firm. Avoid excessively cold temperatures, which can lead to condensation and sugar bloom.
- Demold: Once fully set, carefully invert the molds and gently tap to release your perfect milk chocolate bars.
For those interested in expanding their baking repertoire, consider trying this easy chocolate cake recipe that ensures you get the perfect texture and flavor in your desserts. It complements the skills you develop while making milk chocolate bars.
Pro Tips for Success
Achieving exemplary milk chocolate bars hinges on understanding the scientific principles at play, particularly cocoa butter crystallization and heat management.
- Precision in Tempering: Tempering is the most critical step. Cocoa butter exists in six crystalline forms, but only the stable Beta V crystal (form V) provides the desired snap, glossy finish, and resistance to bloom. Precise temperature control during melting, cooling, and re-warming ensures only these stable crystals form. Deviations will result in dull, crumbly, or soft milk chocolate bars prone to fat bloom.
- Preventing Seizing: Even a single drop of water can cause chocolate to seize, turning it into a grainy, unworkable mass. Ensure all equipment is completely dry, and protect the chocolate from steam while using a double boiler. Moisture causes sugar crystals to dissolve and then recrystallize unevenly, disrupting the smooth texture.
- Refining for Smoothness: If you desire an exceptionally smooth texture, particularly after incorporating the dry ingredients, pass the chocolate through a melanger or use a high-speed blender. This process, called conching, reduces particle size to microns, eliminating any grittiness from the sugar and milk powder and fully developing flavor in your milk chocolate bars.
- Controlling Viscosity: Lecithin, while optional, plays a significant role in managing chocolate viscosity. It’s an emulsifier that reduces the surface tension between the cocoa solids, sugar, and fat, making the chocolate flow more easily. This facilitates smoother pouring and thinner coatings without needing excessive cocoa butter.
- Optimal Storage Environment: After demolding, store your milk chocolate bars in a cool, dry, and dark environment. Fluctuating temperatures are the primary cause of fat bloom (white, hazy surface), as they cause cocoa butter crystals to melt and recrystallize unevenly on the surface.
Storage & Reheating Tips
Proper storage is paramount for maintaining the quality and aesthetic appeal of your homemade milk chocolate bars. Reheating is generally not recommended for finished bars.
- Cool, Dry, Dark Place: Store your milk chocolate bars in an airtight container in a cool, dry, and dark environment, ideally between 18-20°C (64-68°F). This temperature range prevents melting and minimizes the risk of fat bloom.
- Avoid Refrigeration (Generally): While brief refrigeration can help set the chocolate, prolonged storage in the refrigerator is often detrimental. The humidity can cause sugar bloom (a gritty, white surface layer), and condensation upon removal can also cause issues. If refrigeration is necessary, ensure the bars are in a truly airtight container to protect against moisture.
- Shelf Life: When stored correctly, homemade milk chocolate bars can maintain their quality for up to 3-4 weeks. The cocoa butter and milk powder are fats and can eventually oxidize, leading to off-flavors.
- No Reheating: Once solid, milk chocolate bars are not typically “reheated” in their bar form. If you wish to use them for melting (e.g., for dipping or sauces), chop them finely and melt gently using a double boiler, carefully monitoring the temperature to avoid scorching or re-tempering.
To further refine your baking skills, check out this tempting recipe for german chocolate cookies. These cookies provide a delicious contrast to your homemade milk chocolate bars while ensuring you maintain high standards of quality and flavor.
What to Serve With These Milk Chocolate Bars

Pairing milk chocolate bars judiciously can create a harmonious culinary experience. Consider options that provide contrasting textures or complementary flavor profiles.
- Fresh Berries: The tartness of raspberries or strawberries provides a refreshing counterpoint to the sweetness and richness of milk chocolate bars.
- Roasted Almonds or Hazelnuts: Adds a delightful crunch and nutty depth, complementing the creamy chocolate without overpowering it.
- Strong Coffee or Tea: The bitterness of a robust coffee or an Earl Grey tea cuts through the richness of the milk chocolate bars, cleansing the palate.
- Citrus Zest: A delicate sprinkle of fresh orange or tangerine zest can add a bright, aromatic lift, enhancing the chocolate’s complexity.
Frequently Asked Questions (FAQ)
Why is tempering so crucial for making good milk chocolate bars?
Tempering is essential because it manipulates the crystallization of cocoa butter. Without proper tempering, cocoa butter forms unstable crystal structures, leading to milk chocolate bars that are dull, crumbly, melt too easily, and are susceptible to fat bloom. Tempering ensures the formation of stable Beta V crystals, resulting in a glossy finish, crisp snap, smooth texture, and superior shelf stability.
What causes milk chocolate bars to develop a white, hazy coating (bloom)?
The white, hazy coating, known as fat bloom, is caused by unstable cocoa butter crystals migrating to the surface and recrystallizing. This typically occurs due to improper tempering or storing the milk chocolate bars in fluctuating temperatures. When the chocolate warms even slightly, the unstable fat melts, separates, and then resolidifies on the surface as the temperature drops, creating the visible white layer. It affects appearance and texture but is harmless.
Can I use liquid milk instead of milk powder in this recipe for milk chocolate bars?
No, liquid milk cannot be directly substituted for milk powder in chocolate making. Water content in liquid milk would cause the chocolate to seize instantly, turning it into a gritty, unworkable mass. Chocolate making requires an anhydrous (water-free) environment to ensure proper emulsification and a smooth texture. Milk powder provides the necessary dairy solids and fat without introducing water.
Milk chocolate bars are a delightful treat that combine the sweetness of sugar with the richness of cocoa butter and milk solids. By understanding the fundamentals of chocolate making, you can create an array of confections that exceed commercial options, enhancing your cooking skills with the nuances of chocolate craftsmanship.
Final Thoughts
Mastering homemade milk chocolate bars is a journey of precision and scientific understanding, rewarding you with unparalleled control over flavor and texture. This meticulous approach promises a deeply satisfying confection, transforming simple ingredients into a testament to culinary exactitude.
Nutrition Information (per serving)
(Based on 12 servings per recipe)
| Nutrient | Amount |
|---|---|
| Calories | ~250-280 kcal |
| Total Fat | ~18-22 g |
| Saturated Fat | ~11-14 g |
| Cholesterol | ~10-15 mg |
| Sodium | ~15-20 mg |
| Total Carbohydrates | ~20-25 g |
| Sugars | ~18-22 g |
| Protein | ~3-5 g |

milk chocolate bars
Ingredients
- 150g Cocoa Butter
- 50g Cocoa Mass (or Unsweetened Chocolate)
- 150g Whole Milk Powder
- 120g Granulated Sugar
- ½ teaspoon Vanilla Extract
- ¼ teaspoon Sunflower Lecithin (Optional)
- Pinch of Salt
Instructions
- Prepare and sift ingredients.
- Melt cocoa butter in a double boiler.
- Incorporate cocoa mass into melted cocoa butter.
- Gradually whisk in sifted milk powder, sugar, and salt.
- Refine mixture using a blender if necessary.
- Cool chocolate and seed with pre-tempered chocolate.
- Reheat to working temperature for molding.
- Pour into molds and cool until set.
- Demold once fully firm.
Notes

Adam is the lead recipe developer and culinary scientist behind Empirefoodie. Holding a Bachelor of Applied Science in Culinary and Food Science from Cincinnati State, Adam brings technical precision to home cooking. Based in Missouri, he specializes in breaking down the "why" behind cooking techniques to help you get consistent, delicious results every time. At 30, Adam is dedicated to turning kitchen experiments into family-favorite meals.
Comments are closed.